The final all day event for 2012

Here are the dates for 2012 Experience days that Sharon & myself have organised.

Now Booking

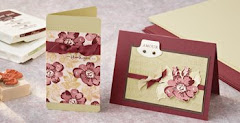
Saturday 1st December at Hethersett Village Hall for the last all day event of 2012 & a Christmas Card & gift event
Theme - A whole day crafting
Cost - £25

Future Dates:


Saturday 1st December ~ Christmas gift event

And don't forget for every event you attend you will receive a FREE raffle ticket which could win you a
BIG SHOT BUNDLE.

(Draw to take place during December's Event)

All DAYS HAVE VERY LIMITED PLACES SO BOOK NOW TO AVOID DISAPPOINTMENT. YOUR PLACE IS ONLY SECURED ONCE PAYMENT IS RECEIVED.


Do you fancy a catalogue party?

Did you know that you can qualify for hostess benefits without having to hold a party?

Just by showing your catalogue around to your family, friends or craft group, If you collect together orders totalling over £150 you will qualify for a free hostess benefits.

If your interested please contact me for further details.

Search This Blog

Contact me

Stampin' Up Contact details I have set these business hours to preserve my home / work life balance.

Email ~ Anytime ~ lovellsinnorfolk@hotmail.co.uk
Or call me between 9.30 Am ~ 8Pm ~ 07092984580


Showing posts with label A jolly Holly Christmas {Retired}. Show all posts

Thursday, 8 September 2011

Stampers 6 project from August


Inside flap of the box has a greeting, but you could also put an image here if you prefer.

I have been such a bad blogger this summer, todays post is the August project from my Stampers 6 / 7 group that I have only just got round to photographing & editing.
The summer has been very strange for lots of reasons.

  • Abi went on Study leave in May & went on to take her GCSE's
  • June our middle son got married
  • June Dan came home from his first year at University & bought bags & bags of belongings that wouldn't fit into storage.
  • At work we lost both of our weekend staff, but to safeguard jobs neither were replaced immediately, leaving the existing staff to cover both Saturdays & Sundays, which is something that I seldom had to do previously, so extra hours & commitments ate into my spare time.
  • Two litters of beautiful kittens the first litter had two kittens & the second litter had four kittens, one of which we kept as one of my big cats went missing 15 weeks ago.
  • I also re-discovered my love of baking, well cupcakes & cake pop's but i'll save that story for another day.
I realised something last Tuesday after we had taken Dan back to Nottingham & Abi had started 6th Form that I hadn't spent a day at home on my own since early May, I don't mind my own company it gives me quiet time to be creative. Usually I start Christmas projects in July but this year I am very much later.

So to kick start Christmas I made this delightful little matchbox card & matching gift card. I thought that you could use these as Table favours or as little gift boxes containing Chocolates, Mini soaps or even a pandorra charm.
I have used the set Contempo Christmas & the Elegance wheel ( Which isn't strictly Christmas but thats exactly what I love about Stampin' Up & being creative )
Contempo Christmas 118734 wood mounted 120594 Clear mounted


Supplies needed to make this card
3" x 12" whisper white card
Scored at 3" , 4", 7", 8" & 11"


The areas coloured red are the areas that need to be decorated  before assembly
4 7/8" x 4 7/8" Whisper white square
Scored at 1" in from the edge on all four sides, this makes the drawer to slide inside the box.

2" x2" Whisper white
2 1/4" x 2 1/4" co-ordinating card stock
Scraps of co-ordinating card stock & DSP to decorate.

Tools
Tombow glue
Mini bulldog clips ( available from good stationers )
Stamp a ma jig
1/2" circle punch
Ornament punch
1 3/8" Circle punch
Word Window punch
Paper Piercer
Stamps
Contempo Christmas
Ink
Old Olive or Wild Wasabi
Real Red or Cherry Cobbler
Decorations
Dazzling diamonds
Basic Rhinestones
Jolly Holiday DSP

This is the first of my Christmas projects for 2011, so keep checking back over the coming weeks while I catch up with all of my Christmas preparations.


Saturday, 4 December 2010

Is your tree up yet?


I love this time of year when all of the decoration boxes come out of the loft & it really begins to feel like Christmas, well if your house hasn't yet descended into Christmas Chaos then here is a little tree to keep you going, its all made with Stampin' Up punches.

Supply List

110844 1/4" circle ~ Berries / Decorations
119883 Full heart ~ Tree Branches
117190 Jewelery tag
Old Olive Card
More Mustard Card
Early Espresso Card
Real Red Card
Whisper White card
Frost White shimmer paint


All of the above products are from Stampin' Up & are available to purchase Through me.


Thursday, 2 December 2010

Reindeer Table favours

I have been experimenting with some different ideas for table favours for the Christmas dinner table, so here is Rudolph ready to hold a small present or a sweet treat.


Supply List
Crumb cake Card stock 121685
Chocolate Chip Card stock 108599
Basic Black Card stock 121688
White gel Pen105021
Basic Black Journaller pen 105394
Bird Punch 117191
1/2" Circle 119869
1/4" Circle 110844
Top Note Die or similar shaped die

The inside of the box is made from a strip of card either matching or co-ordinating. The strip is 10 1/2 " long x 2 1/2" wide, & is scored at 1/2" in on either long side, & again at 3 3/4" & 6 3/4".
Fold along all of the folds & snip into the middle fold lines.

Glue as shown in the picture.


Glue on the back Top note panel


All of the above products are available from myself as an independent Stampin' Up demonstrator.

Wednesday, 1 December 2010

Santa Table favour


Another Favour box for your Christmas table, of course this could be made in alternative colours to coordinate with your colour scheme.


.

Thursday, 18 November 2010

My stampers 10 Ladies

My lovely stampers 10 ladies are so creative.
Last month when we met I set them a challenge to make a Christmas item that was NOT a greetings card, It had to be 3D & of course it had to contain a Stampin' Up product & not just Tombow glue.
On offer was a £15 Stampin' Up voucher to spend with me, so basically if you rise to my challenge your name goes into the draw for the voucher.


Lucy was inspired by Monica to make this beautiful pendant, she realised after she had made it that I had specified it must be a Christmas item, so creatively she made a 3D stand of a Christmas tree.

By Lucy


Lucy used Occasionally ( Retired ) Tiny Tags set & True Friend ( Retired ) The pendant is made from a domino.


Kate made the cutest snowman, can you guess what she is made from?

By Kate

Did you guess? The body of the snowman Is a children's white glove, her face is a polystyrene ball, the buttons are punched with the triple flower punch ( Retired ) with a brad through the middle, the nose is an orange pencil lead. The Stampin' Up item in this project is the 3D tree that the snowman is holding made from the A Holly, Jolly Christmas set ( Retired ).
Well done Kate that is lovely, How any are you making for Christmas?

By Alice
Alice made this tree decoration using an origami fold that she taught me, she made me a layer & I have searched for it all day, but I think I remember how you make it, Alice used Certainly celery ribbon to Hang her tree up with.


Thank you to all that took part, The winner of the £15 voucher was Kate, chosen at random during the evening.


Well done kate


Monday, 15 November 2010

Scrapbook House

Finally I have arrived in my craft room.


What a busy week last week was with viewing 6th forms & work I don't think I sat down until Thursday. I don't think that it helped as I had a major blitz of the craft room, airing cupboard & then decided I needed a bedside table!!! Simple enough request you may think, but not in this house. We have been living in our house now for 5 years  & we are slowly getting the house how we want it. I must confess to hating the house for the first 18 months that we lived here. It was a newly built house and week after week we had builders in & out with there trusty mastic guns to fix the ever lengthening faults list, well I digress. Two years ago following up on a census our house was chosen to be surveyed by a government surveyor, where we found out that although we have 4 bedrooms, my craft room is not large enough if we wanted to let it out as a bedroom & our room is only 1" over the legal measurements for a double bedroom. Can you see the problem here? With fitted wardrobes the only option & they had to have folding doors, we are extremely challenged for space. So yesterday DH thought he would move the bedroom around into the only other position it would fit so I could have a bedside table. Well he managed it & now I have space for a bedside table, although it will have to be a small one.
So all week I have been full of inspiration but I have only just made it into the craft room


Whilst I was away at the recent Stampin' Up convention I was very fortunate to see some very inspiring demonstrators on the main stage, one of these was a fellow UK demo called Michelle Last, Her blog is wonderful so pop over and see some of her creations.


My Inspiration


One of the projects that Michelle shared with us was the mini scrapbook houses using this template


Roof panel measures 14cm x 9cm


For my house I have used the card stock & the papers from the Simply scrappin' Christmas Jingle kit & have made a little house to give as a Christmas card, inside the roof panel I've stamped a greeting from the occasional greetings stamp set, I will also use this to write my message.


Just a note, it is easier to stick your ribbon onto the base card layer before covering both sides with the designer series papers, it is much stronger & tidier.


Ready to decorate with some pictures of our Christmas preparations
If you pop over to Michelle's blog you can see that she has made them for a variety of different occasions & they are all equally as lovely


This will be one of the projects that I am making with  my stampers 10 & Stampers 6 groups on our optional December meeting.
There are two sessions Monday 6th December at 7pm & Thursday 9th December at 7pm.
be sure to let me know which session you would like to attend.


All of the product used in this project is available from Stampin' Up & can be purchased through me as an independent creative coach.


Tuesday, 19 October 2010

Pete the Christmas Penguin

Let me introduce Pete the super cute Christmas Penguin.
He is one of my Punch Art projects


Supply List


  • 1119859 Large Oval Punch - for Arms (102851 Basic Black)
  • 119863 Small Oval Punch - for Mouth (105117 Pumpkin Pie)
  • 119851 Curly Label Punch - for Feet (Pumpkin Pie)
  • 119873 3/4" Circle Punch - for Eyes (Basic Black)
  • 119871 Corner Rounder Punch - for Body
  • 119883 Full Heart Punch (106578 Real Red card stock)
  • 113463 Top Note Die - for Body Front (100730 Whisper White) Not yet available in the UK but there are other similar Sizzix dies 
  • 109034 Real Red 1 /4" Grosgrain Ribbon
  • 105021 White Gel Pen
  • 106578 Real red cardstock
  • 106565 Bashful Blue Cardstock

Saturday, 9 October 2010

Well the weather feels wintry so here is a card to match

 With the weather so Wintry I decided that a card to match was what was needed, The base of the card is Bashful Blue & I used one of the Serene Snowflake stamps to stamp a background pattern with Night of Navy ink. The main panel is stamped on Very Vanilla card stock & mounted on a layer of Night of Navy. The tree's from Lovely as a Tree are stamped onto the layer in Garden Green. The misty background is Marina mist applied using a sponge Dauber.
The Deer from the Winter Post set is stamped in Early Espresso in front of the tree's. To make the snow effect I used the Versamark pen to scatter the snow, this was sprinkled with heat & stick powder, heated using my heat gun & when melted I sprinkled on Dazzling diamonds & heated briefly until set.

All of the above products are from Stampin' Up & are available to purchase through me.

Wednesday, 22 September 2010

Good friend is following in the footsteps of True friend

As promised I have now chosen another retiring set to feature, today it's the turn of Good Friend.
I love this card as it looks like one of the painstakingly stitched cards.
The colours for this card are Glorious Green. Real Red & Whisper white.
The firework stamp was stamped at 2 o'clock, 4 o'clock, then 5 o'clock, 7 o'clock, then 8o'clock, 10 o'clock and 11 o'clock, 1 o'clock. Then using a 2nd generation stamping I stamped between the gaps.
2nd generation stamp is where you ink the stamp pad & stamp off onto scrap paper & you then use the 2nd impression on your project.
The greeting is from A Jolly Holly Christmas set & stamped with Real Red ink.
The corner decoration was made using the pricking mat & piercing tool.
The holly like dots were made using the Stampin' Write pen in Real red & coated with Crystal lacquer.
The top of the wreath has two holes made with the crop o dile & threaded through with real Red Grosgrain ribbon, before matting onto a layer of Real Red cardstock.


Friday, 10 September 2010

Farewell to some old favorites

Not just one retiring set but two on today's card A Holly Jolly Christmas {R} Spotlight on Christmas {R} These sets are only available whilst stocks last until 30th September. the cardstock that I've used is Old olive, real red, Whisper white, designer series papers from the Christmas Jingle kit ( Whilst stocks last )
The tree's on the card are coloured using Stampin' write markers in Chocolate Chip & Garden green the swirls are with the Real red ink pad. Two way glue pens from Stampin' Up are great for accenting small areas with the Dazzling diamonds glitter. Both of the ribbons are also from Stampin' Up Old Olive striped Grosgrain & Very Vanilla taffeta. The punches are Word window, Small tag & Large tag.
All of the above products are from Stampin' Up & are available to purchase through me.

Friday, 20 August 2010

A jolly Holly Christmas ~ Make & take

The second of Wednesdays make & takes is using A Jolly Holly Christmas
The tags on the card are made from Kraft card & the card blank is Chocolate chip, the backing papers are from the sweet pea paper stack. The stamps were coloured using the Stampin write pens.
Dis you know that you can create your own reinforcing rings using two of the Stampin' Up circle punches.
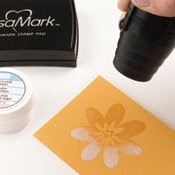
Firstly punch using the 1/4" circle, not too close to the edge, then using the 1/2" circle punch held upside down over the first hole & punch & you then get the fake reinforcing rings


All of the above products are from Stampin' Up & are available to purchase through me.

Related Posts Widget for Blogs by LinkWithin

Stampin' Techniques

Stampin' Techniques
Two step Stampin

Watercolouring

Masking

Markers

Rock n roll

Stampin' Pastels

Heat embossing

Crafts are here

Crafts are here, crafts are there,

My craft supplies are everywhere.

I really should clean this mess,

but I like it I confess.

Floor is littered, chairs are piled,

Kitchen's looking pretty wild.

On the table, counter too,

Seems that any place will do.

Hall is stacked with cartons high,

filled with things folks like to buy.

Garage is full, but so far....

there's still room to park the car.

I never have an idle day,

New ideas come my way.

Don't know yet what I'll create,

but my imagination's great.

My family smiles, they don't complain,

although at times I am a pain.

but when all is said and done,

I really am a crafty one!

I"ve been visited

link to free hit counter html code
Visit the hit counters gallery.

Guest book

NeoCounter