| | January's flower is the Carnation. |
| | February's flower is the Violet. |
| | March's flower is the Daffodil. |
| | April's flower is the Daisy. |
| | May's flower is the Lily-of-the-Valley. |
| | June's flower is the Rose. |
| | July's flower is the Water Lily. |
| | August's flower is the Gladiolus. |
| | September's flower is the Aster. |
| | October's flowers are Cosmos. |
| | November's flower is the Chrysanthemum. |
| | December's flowers are Narcissus. |
Tuesday, 27 November 2007
Flower for the month
Posted by
Lavender stamper
on
18:56
0
comments
Labels: flower
Sunday, 25 November 2007
Ribbon Storage

Whilst searching through one of my favourite galleries I came across this brilliant idea for storing ribbons.
I cannot take credit for the idea that goes to k_benko
What a brilliant idea a length of white guttering.
Posted by
Lavender stamper
on
09:30
2
comments
Labels: ribbon
Card sizes
A6 is half of A5 (105 x 148mm) or (10.5 x 14.8) cms
A5 is half of A4 (148 × 210mm) or ( 14.8 x 21) cms
A4 measures (210 × 297mm) or (21 x 29.7) cms (standard size printer paper)
A3 is twice A4 (297 × 420mm) or (29.7 x 42) cms
A2 is twice A3 (420 × 594mm) or (42 x 59.4) cms
A1 is twice A2 (594 × 841mm) or (59.4 x 84.1) cms
A DL size is the A4 folded into 3 equal portions - it's a standard office size and dead easy to get the envelopes.
Envelope sizes are usually given in 'C' numbers
114 x 162mm or (11.4 x 16.2) cms (C6)
110 x 220mm or (11 x 22) cms (DL)
130 x 130mm or (13 x 13) cms (square)
Other common sizes that you can get are:
162 x 229mm or (16.2 x 22.9) cms (C5)
125 x 175mm or (12.5 x 17.5) cms
155 x 155mm or (15.5 x 15.5) cms (square)
Posted by
Lavender stamper
on
09:20
0
comments
Labels: envelope sizing
Friday, 23 November 2007
5 from 1 challenge
I am having a 5 from 1 challenge
.
Anybody that fancies taking part its easy.
All you have to do is create 5 cards from one set of stamps or a single stamp.*
Or
5 cards from one sheet of paper.**
* one stamp set is ie: a sheet of hero arts, woodware or stampin up set.
**One sheet of paper is cards using the same paper or collection of papers ie basic grey figgy pudding.
When you have done the cards add them to your gallery and submit a link this blog, by leaving a comment on this post.
http://lavender-stamper.blogspot.com
There will be a small prize for my favourite 5 from 1 collection.
Closing date Monday 3rd December
I will send you a private e-mail for your snail mail address & post the results on this blog & the Docrafts forum.
The set of stamps used in my 5 from 1 is by Stampin up and is called season of joy and contains 8 stamps.
Posted by
Lavender stamper
on
15:42
0
comments
Labels: Basic Grey, challenge, Gallery, stampin up
Alternative Christmas verse
If Santa was....
If Santa was a Henderson or any surname
Cockney
Liverpudlian
Brummie
Geordie
Taff
Jock
from Anytown
etc
If Santa was a Geordie
He'd be a builder on the side
Because chimneys are very narrow
And Santa's very wide
Overnight, there would appear
A big hole in your roof
And you'd know that Santa did it
But you wouldn't have the proof
Would take your remaining money
While you saved up for the arrival
Of the Geordie Easter Bunny
**************************************
If Santa was as shrewd as you
He'd take a royalty share
Of the billions of Santa cards
Published every year
He'd be bigger than Walt Disney
And Spielberg put together
He'd move to a tax haven
And enjoy the better weather
And if you expected him to visit you
You'd have to save up all the Summer
House calls are expensive
Have you ever called a plumber?
Posted by
Lavender stamper
on
09:45
0
comments
Wednesday, 14 November 2007
Twinkling H20's ~ demonstration
Last night I demonstrated Twinkling H20's in the store where I work. We had a customer evening until 9pm, there was a lovely atmosphere with a band or musicians on each floor and the wine and mince pies were well received, so everyone was in the party spirit.
I spoke to some lovely people who were fascinated with the H20's especially as the work so well when painted onto black card, so today I have pile of pieces I stamped & painted whilst demonstrating to make into cards & toppers.
Whilst I was making up some samples during the day I did try & bleach out some of the black cardstock, without much success as I melted my brush in the bleach...... oop's needless to say I didn't use that part of the technique in my demo.
Posted by
Lavender stamper
on
09:41
1 comments
Labels: Twinkling H20's
Baby's First Christmas
I have been asked to make 5 baby's first Christmas cards, so far i have only made the first two, so thats one of my projects for today.
Anyone with baby's first Christmas cards in a gallery I would love to take a peek.
Two more finished today.
Posted by
Lavender stamper
on
09:33
0
comments
Tuesday, 13 November 2007
Twinkling H20's ~ rubber stamping technique
They are wonderful for "direct to rubber" techniques.
Here's how:
1. Spray a little water with a fine mist spray bottle or even just drop a few drops of water in with an eyedropper. Mix the water into the paint with your paintbrush. Have several paintbrushes on hand to do this, one for each color you're using.
2. Make sure that your stamp doesn't "resist" the paint. Some stamps, especially the bold ones, resist water-based paints due to a coating on the rubber from manufacturing. If your ink pens or the H2O's tend to bead up on your stamp, just lightly sand the rubber with a fine grit sandpaper (I use 600 grit) and clean the stamp.
3. Paint the H20's onto the rubber. Bold stamps work well, but fine line work well too! If you're quick with your painting and your paint is still wet, stamp immediately. Otherwise, use a fine mist bottle and lightly mist your rubber, then stamp. Mist again, stamp again to get a lighter impression. Do this again to create various depths of image brightness and to create "shadows".
4. Let dry and enjoy!
The Hero Arts real flowers collection works exceptionally well with this method.
Posted by
Lavender stamper
on
13:56
0
comments
Labels: colouring medium, rubber stamping, Twinkling H20's
Painting with Twinkling H2o's
1. open the jars and spritz with a mist or 2 of water. Let it sit about 30 sec. This preps the cake-softens it a bit so you can easily add more water and mix. I use the spritzer bottle to add fresh water through my paint session as needed& a big jar of water to clean my brush.
2. I don't use a water brush like many do. I like to control the amount of water& with a waterbrush I find that harder to achieve. It's convenient for travel, but I have more success with a regular paint bush. I keep a big jar of water, clean my brush & gently squeeze the bristles to remove excess water. There is still plenty on the brush to paint with, sometimes all you need is a damp brush. If it drips....it's too much.
3. I also don't paint directly from the pot for the most part. I take my colour from the cake on my brush to a plastic palette. (piece of plastic, glass, old plate, anything that works, even the lid) This keep my colour shade consistent through the painting. If I take the paint from the pot as I paint (I am not a speed painter) the cake absorbs the water, get thicker & I find myself having to reconstitute the paint. This means I might end up with a different shade then I started with. With the paint on a palette it stays the same. Even if it dries on palette, dip your brush in fresh water, squeeze out the bristles & pick up your color from the palette. You can easily reconstitute these paints. You need not clean the palette either. Just leave it till next time and you can always re- wet and use or make color washes after your paint session is over.
4. Less is more!! The less water you use, the more intense the shimmer. Practice on a scrap on paper. Lots of water equals a paler shade and less shimmer. Little water equals intense shade and lots of shine.
5. Start with embossed images rather then a scene till you get the hang of it. The embossing acts as little "barriers" or reservoirs for your paint. Also, the shimmer will often obscure your stamp lines. You can over-stamp with positioner, but this is a fast easy way to make them really stand out.
6. You can use regular card stock with H20's. It's one of the things I love about these paints! While it's wonderful on sheer heaven, expensive watercolor & such, you don't need them to use your Twinkling H20's. Practice on plain old card stock first. I've painted on cheap envelopes, copy paper & plain old card stock with little to no wrinkling. Just keep in mind you'll want to use less water. Actually I prefer to use them on smoother, less absorbent paper like traditional watercolor. I find it easier to blend the colors on smooth paper& the shimmer shows up so much more IMHO. And the shimmer is why we shelled out for these paints isn't it?
7. Twinkling H20's dry so fast I generally don't blot my paper at all. If it does wrinkle, spritz the BACK of the paper, sandwich in-between wax paper and put inside a phone book to flatten.
8. These colors blend so easily. To blend your colors just clean your brush and squeeze it out so it's just damp. Go over the colors to blend & you will be surprised at how smoothly they flow together.
Posted by
Lavender stamper
on
13:53
0
comments
Labels: colouring medium, Twinkling H20's
Friday, 9 November 2007
What does love mean?
A group of professional people posed this question to a group of 4 to 8
year-olds, "What does love mean?"
The answers they got were broader and deeper than anyone could have
imagined. See what you think:
"When my grandmother got arthritis, she couldn't bend over and paint
her toenails anymore. So my grandfather does it for her all the time,
even when his hands got arthritis too. That's love."
Rebecca- age 8
When someone loves you, the way they say your name is different. You
just know that your name is safe in their mouth."
Billy - age 4
"Love is when a girl puts on perfume and a boy puts on shaving cologne
and they go out and smell each other."
Karl - age 5
"Love is when you go out to eat and give somebody most of your French
fries without making them give you any of theirs."
Chrissy -age 6
"Love is what makes you smile when you're tired."
Terri - age 4
"Love is when my mommy makes coffee for my daddy and she takes a sip
before giving it to him, to make sure the taste is OK."
Danny - age 7
"Love is when you kiss all the time. Then when you get tired of
kissing, you still want to be together and you talk more. My Mommy and
Daddy are like that. They look gross when they kiss"
Emily - age 8
"Love is what's in the room with you at Christmas if you stop opening
presents and listen."
Bobby - age 7 (Wow!)
"If you want to learn to love better, you should start with a friend
who you hate,"
Nikka - age 6 (we need a few million more Nikka's on this planet)
"Love is when you tell a guy you like his shirt, then he wears it
everyday."
Noelle - age 7
"Love is like a little old woman and a little old man who are still
friends even after they know each other so well."
Tommy - age 6
"During my piano recital, I was on a stage and I was scared. I looked
at all the people watching me and saw my daddy waving and smiling. He
was the only one doing that. I wasn't scared anymore."
Cindy - age 8
"My mummy loves me more than anybody . You don't see anyone else
kissing me to sleep at night."
Clare - age 6
"Love is when Mummy gives Daddy the best piece of chicken."
Elaine-age 5
"Love is when Mummy sees Daddy smelly and sweaty and still says he is
handsomer than Robert Redford."
Chris - age 7
"Love is when your puppy licks your face even after you left him alone
all day."
Mary Ann - age 4
"I know my older sister loves me because she gives me all her old
clothes and has to go out and buy new ones."
Lauren - age 4
"When you love somebody, your eyelashes go up and down and little stars
come out of you." (what an
imagination)
Karen - age 7
"Love is when Mommy sees Daddy on the toilet and she doesn't think it's
gross."
Mark - age 6
"You really shouldn't say 'I love you' unless you mean it. But if you
mean it, you should say it a lot. People forget."
Jessica - age 8
And the final one -- Author and lecturer Leo Buscaglia once talked
about a contest he was asked to judge.
The purpose of the contest was to find the most caring child.
The winner was a four year old child whose next door neighbor was an
elderly gentleman who had recently lost his wife. Upon seeing the man
cry, the little boy went into the old gentleman's yard, climbed onto
his lap, and just sat there. When his Mother asked what he had said to
the neighbor, the little boy said, "Nothing, I just helped him cry"
Aw bless
Posted by
Lavender stamper
on
18:15
1 comments
In this life I am a woman
In this life i am a woman,
in the next life I would like to be a Bear
When you are a bear you get to hibernate, you get to do nothing but sleep for six months, I could cope with that
Before you hibernate you are supposed to eat yourself stupid, I could deal with that too.
When you are a girl bear, you get to birth your children (who are the size of walnuts) whilst you are sleeping, and wake to cute cuddly cubs, I could definitely deal with that!
If you are a momma bear, everyone knows you mean business, You swat anyone who bothers your kids and if your kids get out of line, you swat them too. I could deal with that.
If you are a bear, your mate EXPECTS you to wake up growling, he EXPECTS you to have hairy legs and EXPECTS you to have excess body fat.
YEP I'M GONNA BE A BEAR!
Posted by
Lavender stamper
on
18:07
0
comments
Labels: wisdom
Brenda Pinnick Holiday kit
Wow!
This 8000 piece kit is amazing, the box is crammed full & I cannot wait to use it, unfortunately I am off to work today despite the chaos that is going on around the region.
Thank you for those that have contacted me to add tips & hints to the list I am publishing on my blog, I will update this list tonight. Anyone that wants to send me a hint or tip please feel free to contact me.
Happy crafting
Lisa
Posted by
Lavender stamper
on
09:31
0
comments
Labels: Brenda Pinnick
Wednesday, 7 November 2007
Top Tips
my top tip- never take your purse into a craft shop !!!!
(Thanks crafty piglet)
Don't buy any Penny Black stamps as you'll soon be addicted and run out of money!!
Thanks Vanessa.
1) invest in a decent card folder and bone creaser and make your own card blanks-much cheaper than buying ready made ones.
2) when shopping for a particular craft item- always shop around first as very often you can it much cheaper elsewhere!
3) have a regular craft session just using up all odds and ends and left over scraps, you'll be amazed how creative you can be.
4) turn your junk mail into craft items...pretend credit cards can be heat embossed, envelope liners to use as iris folding papers, shop leaflets used as backing papers, cd/dvd freebies as embellishments!
5) don't buy rubber stamps or dies unless you can think of at least 3 different occasions on which you could use them!
6) When using ribbons, cutting the end of the ribbon at an angle will prevent the ribbon from fraying.
7)When not using your ink pads storing them upside down will retain the moisture in the ink and stop them drying out.
8) When heat embossing wipe over the card with a little baby talc to prevent static.
9) A piece of A4 paper, rubbed over with baby oil and left to dry, looks just like plain vellum!
10) Divide your papers and cards into colour's, so you can pick what you want easily.
11) when heat embossing or stamping use baby wipes to clean edge of the stamp so you don't get excess ink of paper/card.
12) If you run out of letters for scrapbook you can cut up old ceral boxes and use the letters.
13) Don't waste money buying coloured glaze pens. you will only need the clear
one. You can colour the images yourself and then glaze with clear pen.
14) Pergamano, rub over both sides of your parchment with Bounce dryer sheet, this makes it easier to emboss and prick.
15) Don't always buy the cheapest inks as the better quality ones give a better stamp impression every time.
16)Invest in a good quality paper trimmer/guillotine with a built in ruler as it saves you loads of time measuring to size.
17)Take photos of your made cards and store them on the computer or a usb flash drive to refer to at a later date if you need to make that card or similar again. Add notes about the particular technique used if it was a difficult one.
18) To keep punches sharp, punch a few times through a sheet of tinfoil (gives your bacon under the grill a certain style too! lol)
Posted by
Lavender stamper
on
18:56
1 comments
Labels: Craft room, ink pads, ribbon, rubber stamping, tips
Ribbon Storage
Made from a covered twiglet tube , Then eyelets added to thread ribbon through
Thanks Yvette ( li`l red) ~ Docrafts forum for sharing this idea
Posted by
Lavender stamper
on
18:52
1 comments
Shabby princess
I have found a fabulous download site, some are free to download and some are chargeable, it has some really cute kits for card making & scrapbooking.
Take a look they are just yummy.
Posted by
Lavender stamper
on
13:46
0
comments
Labels: downloads
Envelope sizing
Envelope sizes are usually given in 'C' numbers. A C6 envelope fits a card blank that has been made by folding an A5 sheet of card to A6. If you are making your own card blanks, it is best to make them to a size that fits the most commonly found sizes of envelope as it may be hard for you to find other sizes.
The most common sizes:-
114 x 162mm (C6)
110 x 220mm (DL)
130 x 130mm (square)
Other common sizes:-
162 x 229mm (C5)
125 x 175mm
155 x 155mm (square)
A DL envelope is the size of a business envelope - it takes a sheet of A4 paper folded into 3. As there is no 'A' size card that corresponds with a card blank folded to fit in an envelope of this size, the card blanks are often referred to as DL as well.
Posted by
Lavender stamper
on
11:17
0
comments
Labels: envelope sizing, tips
Rubber Stampers Warning
I just got this and thought to share it with you all!
Does this sound familiar to you?
RUBBER STAMP WARNING !!!
A recent study indicated that rubber stamps and
embossing powders give off certain pheromones that
actually hypnotize women and cause them to purchase
unreasonable amounts.
When stored in large quantities in enclosed spaces,
the pheromones (Rubber) cause memory loss and induce
the nesting syndrome (similar to the one squirrels
have before the onset of winter i.e. storing food),
therefore perpetuating their species.
Sound tests have also revealed that the rubber emits a
very high pitched sound, heard only by a select few. A
breed of women known as “Rubber Stamper’s ". When
played backwards on an LP, the sounds are heard as
chants," buy me, stamp me. Emboss me ".
Studies have also indicated that aliens have
inhabitated the earth, helping to spread the effects
that these Stamps have on the human population.
It's also been experienced that these same pheromones
cause a pathological need to hide these Stamp
purchases when taken home ( or at least blend them
into the existing stash ), and when asked by a
significant other if the stamp is new , the reply is:
"I've had it for a while
Posted by
Lavender stamper
on
10:53
0
comments
Labels: rubber stamping, verse, wisdom
Printer Settings for metallic printing
GOLD enter, Red 192, Green 168, Blue104.
DARK GOLD enter, Red 165, Green 138, Blue 82.
SILVER enter, Red 151, Green 151, Blue 168
Posted by
Lavender stamper
on
10:51
0
comments
Labels: metallic printing, Printer
Wedding Anniversaries
The 1st is PAPER, on which you can write
The 2nd is COTTON, all crisp and white,
The 3rd is LEATHER, a bag or some gloves,
The 4th is BOOKS, Lady Chatterley's loves!
The 5th is WOOD, a box full of dreams,
The 6th is IRON, metal not steam
The 7th is WOOL, soft and warm
The 8th is BRONZE, metal in an elegant form
The 9th is COPPER, and 10th is TIN,
If you have got this far you are bound to win.
The 11th is STEEL, so shiny and bright
The 12th is SILK, so soft and so light,
The 13th is LACE, maybe a cloth for a tray,
The 14th is IVORY, leave it for Jumbo,
Its better that way!
The 20th CHINA, cups, plates and the rest,
The 25th is SILVER - really swell
The 30th is PEARL - from an oyster's shell
The 35th is CORAL, from under the sea
The 40th is RUBY, as red as red can be
The 45th is SAPPHIRE - precious and blue
The 50th is GOLDEN - Congratulations to you!
The 55th is EMERALD - so green and so pure,
The 60th DIAMOND - an achievement for sure.
The 65th BLUE SAPPHIRE and 70th PLATINUM
The last two which are reached by some
The 75th is DIAMOND AND GOLD
The 80th OAK **
Or something suitable for the very old!
Posted by
Lavender stamper
on
10:47
0
comments
Labels: anniversary
Paper sizes inches ~ metric
Name-------------------mm--------------------inches
A0-------------------841 x 1189-----------33.1 x 46.8
A1-------------------594 x 841-------------23.4 x 33.1
A2-------------------420 x 594-------------16.5 x 23.4
A3-------------------297 x 420-------------11.7 x 16.5
A4-------------------210 x 297---------------8.3 x 11.7
A5-------------------148 x 210---------------5.8 x 8.3
A6-------------------105 x 148---------------4.1 x 5.8
A7---------------------74 x 105---------------2.9 x 4.1
A8---------------------52 x 74-----------------2.1 x 2.9
Posted by
Lavender stamper
on
09:36
0
comments
Labels: paper sizes
QVC ~ Love them or hate them!
Qvc ~ you either love them or hate them, mine is the latter at the moment.
On the 25th October ( in advance of the screening ) I ordered the much awaited Brenda Pinnick kit, it didn't show on my account as despatched until the 30th. Last night I rang them as it was 12 days since I ordered an in-stock item. The lad on the phone kept saying we quote 5 - 7 working days for delivery.......ugh.... couldn't make him understand that 12 days is longer than 7 working days. For £5.45 you would think that they could deliver in a timely manner.
I know that since the strike they use couriers, so that should be quicker!
I think this will be my first & last QVC purchase.
Posted by
Lavender stamper
on
07:44
0
comments
Labels: Brenda Pinnick, QVC
Saturday, 3 November 2007
This should be my mantra!
and your hand over my mouth
Posted by
Lavender stamper
on
21:50
0
comments
Wednesday, 31 October 2007
Childrens Christmas cards
BubbleShare: Share photos - halloween photos
Posted by
Lavender stamper
on
18:47
0
comments
Labels: Christmas
Happy Halloween

"Oh my, it's getting late."
The second one said, Five little
Five little pumpkins sitting on a gate,
The first one said,
"Oh my, it's getting late."
The second one said,
"But we don't care."
The third one said,
"I see witches in the air."
The fourth one said,
"Let's run, and run, and run."
The fifth one said,
"Get ready for some fun."
Then whoosh went the wind,
and out went the lights,
And five little pumpkins rolled out of sight!
Happy Halloween... A day off from work for me, so I am finishing all of the half finished projects I have on my desk today. I had some new Stampin up Christmas stamp sets arrive last week from America & I have mounted them in anticipation of having a stamping day. I will add these tonight into my gallery.
Posted by
Lavender stamper
on
11:27
0
comments
Labels: halloween, stampin up
Tuesday, 30 October 2007
32 ways to love your heat gun
32 Ways To Love Your Heat Gun
1. Use it with shrink plastic!
2. To dry glue on almost anything!
3. To set the pigment ink on our Paperclay
4. To dry sealer on paperclay quickly
5. Embossing
6. Glassy Glaze
7. Liquid Applique
8. Heat & Stick
9. Heat setting Fabrico
10. Remelting hot or low temp glue to restick something
11. Stamp & Scratch paper
12. Paint stripping
13. Reheating tea
14. Blowing glitter across a stamped area to get a fine sprinkle.
15. Speeding up drying for radiant pearls, ancient page and some other inks.
16. Blowing glitter or other small debris off of the table
17. Carefully now: dry your nail polish! Heat gun holder means no smudges on 2nd or 3rd coat. It stays on my craft table in its heat gun holder and I paint then press the on button and wave my nails under the flow.
18. To puff up fabric puff paints on sweatshirts (Gotta be careful!).
19. To heat up those price stickers on glass--just heat and then peel them right off. This works great on jelly jar labels .
20. My favorite heat gun use is to make smores. 2 graham crackers, chocolate pieces, marshmallow, wooden skewer, heat gun. Heat the marshmallow a nice toasty brown, assemble and enjoy. We did this with a Brownie troop for one of their try its and they loved them.
21. Repairing computer parts: I have a story to tell about my heat gun... It happened this week, and it saved my YOU-KNOW-WHAT!! I am setting up and trial running a new computer in my bedroom, next to my old one, making sure it works, and getting it set it up for transfer of my documentation to the new one, was checking on the CD speakers, and it worked, and I took the
CD out, and the phone rang...........Then, later when I was flipping my mattress over, (need to do it once in a while), the mattress caught on the OPEN CD ROM holder....and bend it toward the ground, and it wouldn't go back into the holder space. It would go so far and then stop, I could force it back in by holding up the plastic, but it wouldn't do it on its own....BRAND
NEW, not even REGISTERED yet! After I stopped hyperventilating, I used my heat gun to heat the plastic a little at a time, and I slowly maneuvered it until the tray would slide shut on it own, and it plays and all is well, THANK HEAVENS FOR OUR HEAT GUN!!!
22. Takes a dipping and keeps on ticking!! My favorite heat gun story is from this web site. One demonstrator dropped her heat tool in her coffee, while it was plugged in. She jumped quick and unplugged it, rinsed it off and let it dry off. Plugged it in, turned it on and it is still running like a top.
23. You can use your gun to remove hardened candle wax. Aim the heat at the wax. When it starts to melt, use a white paper towel to blot it up. Do this a little at a time to prevent scorching your surface.
24. For artsy daredevils: pool some metallic ink on glossy c/s. Aim heat at its center. It will spread the ink and create a nice blob. Sprinkle some of the confetti in our new glitter stacks on top of the blob, then pour on some clear Embossing Powder. Heat again, pour on more EP, melt, and allow
to dry. It makes a nice accent or background for your artwork. I discovered this when trying to find things to do with the new confetti we have. I tried something similar with the regular reinkers and didn't like the results - non impressive. If any of you try a variation of this, please
share your results!
25. Use the heat gun to melt some candle wax onto your paper creating an abstract design, then do a direct to paper technique over it. The wax will resist the ink and also give your paper texture.
26. Melt bits of broken crayons for a background resist. I would melt the various colors of crayon bits until there were melted puddles scattered around the cardstock. Then I would let them harden and use the foam brayer to brayer ink over the whole piece of card stock. Next, I would reheat the crayon until remelted and then soak up the excess with a paper towel. This
would leave some color on the card stock, plus the ink would have resisted these areas. It might make an interesting background. Maybe a little like a faux batik look. (Note: This idea has not been tried! Please report back to the list if you try it!)
27. I use mine with friendly plastic! It's so much easier than putting it in the toaster oven every time you need to soften it! Friendly plastic is THE coolest stuff ever!! It's not even new if you can believe that! I heard they used it in the '70's to make jewelry and now it's making a big comeback. I use it make jewelry and components to embellish cards. It comes in really pretty metallic colors and it kind of wrinkles when you heat it up. While it's hot you can blend colors together and put in beads, charms, even stamped images. Then when it's dry I put a coat of crystal effects over
it because: 1. It makes the plastic super shiny and pretty and 2. if you use charms or beads (as I do) they will fall off when the plastic is cool unless you seal it! Honestly,
28. Speed up effectiveness of bleach stamping by heating the bleach stamped image from underneath after stamping.
29. Make gift baskets and use it to shrink the shrink plastic over the basket. I tried it and just like magic shrunk in no time flat.
30. You can use the heat tool on fun foam. You heat and then imprint a bold or bold line stamp in it.
31.My DH used it to heat the glue of our old linoleum as he peeled it up to lay new stuff. He was impressed by my suggestion to use it and that it worked like a charm!
32.I use it to melt stamped tissue paper to a candle. You can also heat the surface of the candle and then stamp a DD stamp into it. Highlight the impression with paints - maybe our metallic reinkers would work? I tried this a long time ago and didn't get really good results. This past year, I've been making candles with dried flowers in them to sell at a local farmer's market (my other business). Sometimes the flowers wouldn't show up well and I would use
the heat gun to melt off a layer of wax.
Posted by
Lavender stamper
on
17:25
1 comments
Labels: heat gun, rubber stamping, Shrink plastic, tips
Uses of Glitter
USES FOR GLITTER
GLITTER/Candle Stamping
1. Pour Dazzling Diamonds glitter onto a sheet of paper…spread it out a little.
2. Take a rubber stamp (bold outline, like Flutterbys) & stamp the image into an embossing pad.
2. Next stamp the image into the glitter.
3. Check to make sure stamp is evenly coated, tap if there is too much. Turn your stamp rubber side up.
4. Heat your candle with hair dryer or heat tool until just warm & the wax has softened.
5. Stamp directly onto the candle using a even firm pressure. Or roll the candle onto the image making sure you get the entire image. Lift the candle off the stamp or raise the stamp off the candle & admire!!
GLITTER & LACE BACKGROUND
For a basic card:
Cardstock * Sticker Paper * Lace * 1 Dark Shade of Glitter * 1 Light Shade of Glitter
- Cut your sticker paper into 1/4 sheets. Pull the protective backing off the sticker paper to reveal the sticky area.
- Stick a piece of lace to the sticker paper & smooth it down firmly.
- Pour a dark shade of glitter all over the card, making sure the whole thing is covered. Shake off extra.
- Strip lace off of card.
- Next pour light shade of glitter all over card. It will stick to the areas that do not have the dark glitter. Shake off excess glitter.
- Spray seal your glitter with hairspray.
- Tack down onto folded cardstock or whatever your project may be.
GLITTER WINDOW – STAINED GLASS
Clear Window Sheet (1/4 size – postcard size) – static free * Black Pigment Ink * Open Image – ex: Stained Glass set * Glue with small nozzle on end
- Stamp image onto the window sheet with black pigment ink, heat set the ink!
- Fill in an area in the image with glue & do one area at a time.
- When area is filled with glue, put glitter on & dump off the excess glitter.
- Continue to fill in each area.
- When dry put the card together. The card should have an opening to create a window frame. Glitter side should be facing down.
LOOSE GLITTER
- On a previously stamped image, use the Two-Way Glue pen to apply glue where you want the glitter.
- Sprinkle loose glitter on the image, pour off excess glitter, putting it back into the jar. This technique adds glitz to any card.
OR
- Stamp your image using an embossing ink pad.
- Pour Heat & Stick powder all over this image. Remove excess powder.
- Heat with heat gun. Do not overheat. The Heat & Stick powder has become “sticky.”
- Quickly pour on glitter onto your “sticky” image.
- Heat the image again….just to set the glitter.
Posted by
Lavender stamper
on
17:15
0
comments
Uses for fibres
USES FOR FIBRES
1. Map out your vacation route with fiber threaded through eyelets.
2. Use as laces on paper pieced-shoes.
3. Make a frame around a matted photo or journal box.
4. Tie through the hole of a tag.
5. Use in a sports scene as a basketball hoop, soccer net or fishing pole.
6. Create grass or trees.
7. Spell out a title using fibers to stitch out the letters.
8. Wrap around a border, nugget, tag or corner accent several times.
9. Make hair or other features on paper dolls.
10. Use as a string for balloon diecuts or eyelets.
11. Tie lassos for western pages.
12. Create seaweed on an ocean or vacation page.
13. Attach a tail to a kite.
14. Build a mountain/water outline.
15. Use a rope for a tug of war scene.
16 Fringe on animals.
17. Wrap fibers around letters.
18. Create a shadow for die cut letters.
19. Use fibers to tie 2 or more elements together.
20. Weave through mesh.
21. Create bows.
22. Scarf on a paper pieced snowman.
23. Attach to a brad and use it as a yoyo.
25. Used to stitch pieces together to form a pocket.
26. As embroidery stitching.
27. Attach tire (swing) to tree.
28. Wrapping presents.
29. Crossing corners of a photo mat or journal box.
30. Clothesline for hanging mittens with wooden clothespins.
31. Stitching a template design.
32. Thread punchies on fiber and create a bracelet around a photo/mat.
33. Down the length of the page, photo mat or journal box as a border.
35. To hang/attach buttons or charms.
36. Used to hang signs or metal rimmed tags from buttons, brad and eyelets.
37. Decorations on a Christmas Tree.
38. Decorations on an Easter Egg.
39. Create a spider web.
40. Lacing 2 pieces together.
41. Ends of a hammock.
42. Wind fibers tightly to form the centre of a flower or leaves.
43. To knit or crochet page accents.
44. As a blanket stitch around a border, or mat.
45. Tassels.
46. Braiding the fibers together to create borders, page breaks etc.
47. As needlepoint stitches on your page elements.
48. Hanging header letter squares or mini tags.
49. Enhancing die cuts
Posted by
Lavender stamper
on
17:10
0
comments
70 ways to use eyelets & Brads
1. connectors on paper piecing for moveable parts
2. attaching vellum
3. accents on journal blocks
4. to "hang" things from
5. center of flowers
6. center of letters
7. spell out words (outline letters)
8. corners of picture mat
9. eyes of paper dolls
10. nails in a fence
11. earrings for a paper doll
12. belly button jewel for a paper doll
13. "stone" in a ring
14. buttons on a snowman
15. decoration on a child's ball
16. stepping stones on a garden layout
17. attach a fiber to a brad to make a yo-yo
18. attach elements on a page by wrapping wire or fiber
19. to form "bullets" for a list of things
20. as an accent on the tail of a letter
21. in the hole of a tag
22. white - as stars on a black or navy blue sky
23. white - as dropping snowflakes
24. light blue - as falling raindrops
25. orange - as pumpkins
26. white - as moonbeams
27. jeweled belt on a paper doll
28. brown - as chocolate chips on a cookie
29. toppings on a pizza
30. M & Ms
31. buttons on a shirt
32. decorations on an Easter egg
33. decorations on a Christmas tree
34. purple - grapes in a cornucopia
35. lights on top of a police car or fire truck
36. center of a pinwheel
37. center of tires
38. tires on a toy car
39. end of antenna on a bug
40. center of fiber spider web
41. hair ornament on a girl paper doll
42. the "dot" on an i or j
43. attach handle to a basket
44. to attach fibers or lacing something together
45. attach a sign to a post
46. rocks
47. center of propeller on an airplane
48. on serendipity squares
49. sesame seeds on a bun
50. jeweled skirt on a paper doll.
51. use as a spider and paint a face on it with the legs behind it or
use wire for it's legs
52. dots on a ladybug
53. as fillers
54. use as nails on wood (like haunted house windows)
55. Christmas Bulbs on a tree paper piecing
56. eye on a frog
57. use to embellish the corner of tags or
58. borders or
59. titles
60. Attach fabric, twistel or lace to paper
61. use star brads to replicate a night sky
62. ends of a hammock (saw that on a layout at the lss using
Brad-Dazzled brads)
63. use on butterfly wings
64. oval nail heads as Easter Eggs
65. Buttons on a dress
66. shoe buckle
67. dots on a clown suit doll or paper piecing
68. sprinkles on an ice cream cone
69. sprinkles on a cupcake
70. use seashell nail heads on paper torn sand paper to create a beach
look
Posted by
Lavender stamper
on
09:28
0
comments
Labels: brads~eyelets, tips
Versamark ideas
VERSAMARK IDEAS
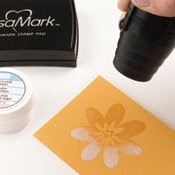
A TRULY CLEAR EMBOSSING PAD
Use like you would the Top Boss. Just stamp and emboss with colored powder or clear powder for a see through shine.
A WATERMARK
This is great for backgrounds, it will deepen the shade of coloured paper wherever you stamp. Just think about this, for every colour of paper you own, you now have a complementary colour of ink!
POPPIN’ PASTELS
There are a couple of ways to accomplish this effect on light colored card stocks.
1.) Apply chalks to the area to be stamped, stamp with VersaMark and allow to dry or use heat gun. Then rub gently with a clean cotton ball. You can get a dramatic effect by adding more chalk to a cotton ball or dauber after you stamped with the VersaMark. Or you can emboss while stamped image is still wet with clear embossing powder and the image will jump out at you!
2.) Stamp first then chalk gently over the stamped area and watch the image magically appear.
REVERSE PASTELS
This time you use brightly coloured chalk to cover dark coloured card stock (Basic Black, Night of Navy, Close to Cocoa, Old Olive, etc.) and then stamp over the chalked area. The ink will pull out the colour of the paper from beneath the chalk. Be sure to clean the stamp before re-inking it as the chalk you removed is now on your stamp and you will dirty your VersaMark pad.
SHADOWING
This is a technique to use with Kaleidacolor pads and word stamps but you can use it for anything really. Just stamp directly over your first image. Because you will seldom be exact you will make a shadow that gives the initial image a 3-D effect. You can even take it a step further and emboss with a transparent powder like Pearl or Iridescent Ice.
BRAYER RESIST
This technique can be done with Gold Encore or VersaMark. Stamp image(s) onto Glossy White card stock using one of the above inks. Gently wipe away the ink using a lotion-free tissue and small circular motion. Ink up your brayer and roll it over the paper. Wherever the VersaMark ink was stamped, the paper will resist the coloured ink from your brayer. This works on matte card stock but looks better on glossy.
VERSAMARK & 2-STEP STAMPIN’
Stamp the same image first with VersaMark & then with metallic (Encore). Just shift the image a little bit when stamping the metallic ink. It gives it a shadowed look. Looks great on baroque burgundy and forest foliage!
EMBOSSING ON GLASS
Using the embossing buddy first, then using the VersaMark to stamp the image on a glass container, then emboss with detail gold or silver. Fill it with candy and tie a ribbon on it.
EMBOSSING WITH YOUR 48 STAMPIN’ UP! PADS
Ink your stamp with VersaMark then stamp on one of our 48 color pads or you can use a dauber to apply the color ink if you are worried about the color pad. Stamp and use clear embossing powder. Heat. Now you can emboss and be perfectly coordinated with the SU! markers, cardstock and inkpads. Be certain to clean stamp before re-inking on VersaMark pad or you will leave color on it.
DISCREET JOURNALING LINES
Although the VersaMark ink is sticky when applied, it dries like regular ink and loses the stickiness. It is Acid-free and safe for scrapbook pages. It works perfectly on all of our colored cardstock.
BATIK TECHNIQUE
Simply stamp your image using Versamark on ultra-smooth white or confetti or some other light CS and then emboss with clear embossing powder. Let cool. Then gently wad paper into a ball or you could fold it into a small square for a different look. Unfold it and smooth it out. Place it on a towel and wet with water so the paper is very damp. Next ink your brayer with a Kaleidacolor pad and brayer across the paper. The image will stay white while the ink will seep into cracks and the rest of the paper will have a batik look. (Like back in the 70’s when you applied wax to a pattern on a shirt and then dipped it in dye, cooled and chipped the wax away.)
Posted by
Lavender stamper
on
07:57
0
comments
Labels: Batik, embossing, ink pads, pastels, rubber stamping, stampin up, tips, Versamark
Crafts are here
Crafts are here, crafts are there,
My craft supplies are everywhere.
I really should clean this mess,
but I like it I confess.
Floor is littered, chairs are piled,
Kitchen's looking pretty wild.
On the table, counter too,
Seems that any place will do.
Hall is stacked with cartons high,
filled with things folks like to buy.
Garage is full, but so far....
there's still room to park the car.
I never have an idle day,
New ideas come my way.
Don't know yet what I'll create,
but my imagination's great.
My family smiles, they don't complain,
although at times I am a pain.
but when all is said and done,
I really am a crafty one!
I"ve been visited
| Visit the hit counters gallery. |