The final all day event for 2012

Here are the dates for 2012 Experience days that Sharon & myself have organised.

Now Booking

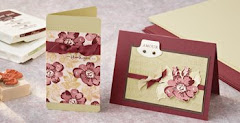
Saturday 1st December at Hethersett Village Hall for the last all day event of 2012 & a Christmas Card & gift event
Theme - A whole day crafting
Cost - £25

Future Dates:


Saturday 1st December ~ Christmas gift event

And don't forget for every event you attend you will receive a FREE raffle ticket which could win you a
BIG SHOT BUNDLE.

(Draw to take place during December's Event)

All DAYS HAVE VERY LIMITED PLACES SO BOOK NOW TO AVOID DISAPPOINTMENT. YOUR PLACE IS ONLY SECURED ONCE PAYMENT IS RECEIVED.


Do you fancy a catalogue party?

Did you know that you can qualify for hostess benefits without having to hold a party?

Just by showing your catalogue around to your family, friends or craft group, If you collect together orders totalling over £150 you will qualify for a free hostess benefits.

If your interested please contact me for further details.

Search This Blog

Contact me

Stampin' Up Contact details I have set these business hours to preserve my home / work life balance.

Email ~ Anytime ~ lovellsinnorfolk@hotmail.co.uk
Or call me between 9.30 Am ~ 8Pm ~ 07092984580


Thursday, 24 July 2008

Paper trees Tutorial

This is so cool another tutorial this time by Jenn Balcer

Paper Trees

by Jenn Balcer

Bust out some holiday paper you've stashed, and create pretty decorations for your mantel or table.

Supplies

  • 12" x 12" Patterned Paper (number of sheets varies depending on size of tree)

  • Styrofoam Form (here, two different cones for trees, 4" spheres for topiary, and 3 7/8" disc for inside pot

  • Paper trimmer

  • Quilting pins(Three packages were used for the trees shown here)

  • Adhesive

  • Terracotta Pot (Optional. 4" diameter pots were used here)

  • Syrofoam to fit inside pot, if used

  • Wooden Dowel (if a trunk is desired)

  • Craft paint and/or pigment ink

  • Moss (optional)

  • Embellishments

Step-by-Step

  1. Step 1

    If you'd like a potted tree, paint the terracotta pot now and set aside to dry.

  2. Step 2

    If you're creating a topiary, or want a trunk, either paint or apply ink to a dowel. Set aside to dry.

  3. Step 3

    Insert Styrofoam in pot.

    Insert dowel in tree form. A bit of adhesive will keep the form in place.

    Center tree over pot, and insert into Styrofoam.

  4. For the topiary, insert dowel all the way through the Styrofoam sphere for the bottom, making sure to keep dowel centered. Remove sphere.

    Insert dowel part of the way into the Styrofoam sphere for the top. Remove sphere.

    Add some adhesive (hot glue is perfect for this) inside the hole in Styrofoam sphere and replace dowel.

    Insert dowel through sphere for bottom of topiary, and apply more adhesive at the bottom. This will keep the dowel from shifting. Any adhesive will be covered by your paper.

  5. Step 4

    Adhere moss and cover Styrofoam base. A few pins here and there may be helpful.

  6. Step 5

    Prepare patterned paper strips by using paper trimmer.

    For the tall tree, four 12" x 12" double-sided sheets were cut into 4" x 1" strips.

    Instructions for each type of tree are to the left of each close up picture.

  7. Step 6

    Bend a paper strip in half. Using a quilting pin, attach to tree form starting at the bottom, and going all the way around the tree.

  8. Step 7

    Repeat Step 6, starting the next row slightly overlapping the previous one, until the entire tree is covered.

    A single pattern was used for each row, but try alternating patterns within the row for a fun look.

  9. Step 8

    One sheet of 12" x 12" double-sided paper cut into strips 3" x 1/2" was used for the smaller tree.

    Strips were curled on one end with a bone folder before attaching to the tree form.

  10. Step 9

    For the topiary, three sheets of 12" x 12" double-sided paper and large and small flower punches were used.

    Large flowers were punched and then the petals curled with a bone folder.

    A small punched flower and Prima paper flower were layered on top as shown, and then pinned to the sphere. To cover any exposed Styrofoam, pin more tiny flowers in the openings.

  11. Close up view of topiary.

  12. Step 10

    Embellish as desired. Here, a loopy bow is pinned to the top of the tree.

  13. Step 11

    Finished paper trees.


Gel or water card tutorial

This is a tutorial for a gel card by Beate
A very talented lady who does the most amazing tutorials.


Gel or Water Card

by Beate Johns

This is a wonderful touch and feel card. No one can resist to play with it for a bit! You will definitely WOW the recipient of this card.


Supplies

image

5 1/2" x 8 1/2" piece of cardstock for card

4" x 5 1/4" piece of cardstock for card front (window piece)

3 3/4" x 5" piece of cardstock for window border (optional)

3 1/2" x 4 3/4" piece of white cardstock (for image)

Ziplock® bag (I used 3" x 4")

Hair gel

Coluzzle©

Double sided tape

Eyelet setter tools and eyelets


Step By Step

Step 1

Step 1.
Use your Coluzzle© to cut a window in your card front. You could also use your paper cutter, a punch or your hobby knife for this task.


Step 2

Step 2.
Cut the next size smaller oval into a complementary colored piece of cardstock to create a border for the window.


Step 2


Now you should have two frames like these.


Step 3

Step 3.
Decorate your card front.


Step 4

Step 4.
If you have a border piece tape it behind your card front. Set aside.


Step 5

Step 5.
Squeeze some hair gel into your ziplock® bag. Only add enough to cover the inside of the bag. Too much gel might cause the bag to "pop" later on.


Step 6

Step 6.
Press excess air out of the bag, close it and spread the gel evenly over the entire inside of the bag.


Step 7

Step 7.
Turn your card front around and tape the gel bag over the opening. Use double sided tape.


Step 8

Step 8.
Stamp the image you want to be seen through the bag on white cardstock.


Step 9

Step 9.
Center image behind gel window and adhere it to the window.


Step 10

Step 10.
Tape the card front to your card.


Step 11

Step 11.
Add eyelets to the corner of the card. Gel bags are heavy and tape alone won't be enough to keep it together unless you use sticky tape.


Tip:
If you plan to send a gel card through the mail, use a padded envelope to prevent the gel bag from popping.

Variations

A whole different hole
As an alternative to punching or cutting an oval-shaped hole, you can also cut out the inside of an image of a container, such as the bag or jar stamps from the SU! "All Wrapped Up" set.

Small stuff
Place small items inside the gel.


Stay Put Bow ~ Tutorial


I have just found a brilliant link for tying a stay put bow with a video tutorial.
Stay put Bow

A lovely blog so have a look round whilst you are there its inspiring.

Blender pen refill recipe

Again I cannot take credit for this recipe, I just found it and wanted to share my find.

Here is the recipe for the Blender pen refill you also needed.

2 teaspoons glycerin
4 teaspoons distilled water
1/4 teaspoon rubbing alcohol

It says you do not need to pull the blender tip out, just use an eye dropper.
This will go a long way so don't double it!


Stamp Cleaner ~ recipe

I have just found this recipe to make your own stamp cleaner, it has a long list of people that have tried it and recommend it, so I am off to the chemist in the morning to get the ingredients.

Make your own Stamp Cleaner, a copy cat of SU's.

2 Cups distilled water
2 Teaspoons Rose Water (purchased at health store)
1 Teaspoons Baby wash (I used a generic brand)

Rose water is a natural, non-alcoholic astringent.
This works, looks and smells just like what you buy from Stampin Up.
As with the SU stuff, should be diluted 4 or 5:1 with water as it's too soapy otherwise
(I learned about diluting it first hand at SU convention when I was a demo).
I think I have about $8 in supplies and I think it will make over 2 gallons of
cleaner.

This post is pasted from the splitcoast stampers forum


Stamped images on a candle Tutorial


I cannot take credit for this tutorial so I have linked back to it's creator Jenni Mouer , but it is truly amazing so I thought I would share it with you, its so comprehensive I think I will give it a try.

Stamped Candles

by Jenni Mouer

Supplies

image

Candle - preferably white or cream

White Tissue Paper

Stamps

Ink Pads

Markers or some other type of coloring medium

Scissors

Wax Paper

Embossing Gun


Step By Step

Step 1

Step 1.
Stamp on tissue paper. Use images that can be colored-in or solid images, in the ink color of your choice.

Tip: Stamp extra images on the tissue in case of a mistake.


Step 2

Step 2.
Color in stamped images using some form of coloring medium, but be careful and test the medium used. With Twinkling H2O™s™ (as in this example), you will want to make sure your Aquabrush™ is not very wet but has a fair amount of watercolor on it. If you would prefer not to color just use a solid stamp with your choice of ink.


Step 3

Step 3.
Cut out your stamped images fairly close to the edges.


Step 4

Step 4.
Take a piece of wax paper and cut it so that it is not any taller than the candle being used and long enough so that it wraps completely around the candle and then some.


Step 5

Step 5.
Take your first stamped image and place it on the candle. Then place the wax paper on top and wrap the wax paper around the candle. Wing out the extra wax paper and pinch close with your fingers making sure the wax paper is tight against the candle.


Step 6

Step 6.
Heat up your embossing gun for 30-40 seconds until it is nice and hot. Moving quickly, wave it over the area where the stamped image is; be sure to keep the wax paper nice and tight. Every candle will have a different wax melting point, but you should see a change begin to take place within a few seconds. As the candle heats up, the pressure from the wax paper should push the image into the melting wax of the candle, embedding the image and leaving your image intact.

Slowly peel the wax paper off the candle. Remember: every brand is different so if you are switching between brands you may need to adjust your heating times a bit.


Step 7

Step 7.
Finish your candle.

You can do numerous images on one candle; just place another image and move the wax paper. It is best to try and not use the same spot on the wax paper for each image, but you can use 1 piece of wax paper numerous times.

Update: Jackie from Docrafts has used greaseproof paper instead of the wax paper and she says that it works just fine she has just finished a large batch of these candles for her wedding.

Thanks Jackie


Sunday, 20 July 2008

Penny Black Saturday challenge 6

Penny Black Saturday challenge ~ Snow much fun

Snow Much Fun
We would like you to make a Christmas card what features snow in some way,
it can be papers, brads, embossing what ever you like as long as we can see snow and of course
at least one penny black image as always its entirely up to you what you make - card, atc, altered art etc..


So here are my cards............
The let it snow stamp is from a stampin up set.


2 from 1


2 cards from 1 stamp set

I had made up the bases of these cards for another idea but had never used them, they were just sitting there and I couldn't remember what I had intended to do with them, so I stamped up some more of the flowers from the Stampin up best blossoms set.
The background papers are Laura Ashley & the flowers are stamped with chalk based pads, the centre of the flowers are acrylic dots.


Saturday, 19 July 2008

1 sketch 3 cards

1 Sketch 3 cards
I found a sketch on splitcoast stampers so I had a go at the sk
etch using different stamps, different papers & colours.
The stamp set used is by Stampin up called Best blossoms. The papers are Laura Ashley.

All of the card used is from the 4 collections available from Stampin up.


Related Posts Widget for Blogs by LinkWithin

Stampin' Techniques

Stampin' Techniques
Two step Stampin

Watercolouring

Masking

Markers

Rock n roll

Stampin' Pastels

Heat embossing

Crafts are here

Crafts are here, crafts are there,

My craft supplies are everywhere.

I really should clean this mess,

but I like it I confess.

Floor is littered, chairs are piled,

Kitchen's looking pretty wild.

On the table, counter too,

Seems that any place will do.

Hall is stacked with cartons high,

filled with things folks like to buy.

Garage is full, but so far....

there's still room to park the car.

I never have an idle day,

New ideas come my way.

Don't know yet what I'll create,

but my imagination's great.

My family smiles, they don't complain,

although at times I am a pain.

but when all is said and done,

I really am a crafty one!

I"ve been visited

link to free hit counter html code
Visit the hit counters gallery.

Guest book

NeoCounter