Wednesday, 7 July 2010
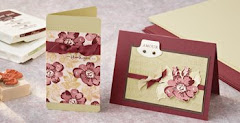
Sharon's beautiful card fo Experience day
It is made with the Stampin' Up Butterfly punch. Pop over to Sharons's Blog & see what else she's been making with the Stampin' Up range

Posted by
Lavender stamper
on
23:28
0
comments
Labels: Butterfly punch, Medallion, Sincere salutations, Stampin' Up experience day
Happy Birthday Sharon

Posted by
Lavender stamper
on
09:00
0
comments
Tuesday, 6 July 2010
A new fold for the Stampin' Up experience Day
Posted by
Lavender stamper
on
23:16
0
comments
Monday, 5 July 2010
Birdhouse box ~ Experience day project
Posted by
Lavender stamper
on
17:30
0
comments
Labels: 3D items, Bird on a branch, Flight of the butterfly, Pocket silhouette
Sunday, 4 July 2010
What a hectic few days
Well where to start with the last few days hectic but very enjoyable It has been like a rollercoaster ride this week of highs & lows so here goes. I was approached last week via e-mail asking if I would like to be featured in an article called the carnival of shopping, when I looked into the company who were producing the feature I was extremely flattered. We also had our higely popular Stampin' Up experience day to finish planning for & anyone that has ever organised a day like this will appreciate the thought & work that goes into planning an event like this. Well yesterday was the day of our 2nd Stampin' Up experience day & we were blessed with a breeze coming through the hall at Hethersett, otherwise it would have been very very hot< many thanks to all of you who came along & to our families for supporting us especially paul who got up at 6am to bake the brownies as we ran out of time on Friday night.
The next event we have planned is 31st October & with lovely sets that will be in the new catalogue & some of the ideas that we have planned I'm sure that the day will be as popular so if you fancy joining us then booking is essential
Also on Friday night I had a meeting with Lydia who has agreed to join our team of Stampin' Up demonstrators, I am sure that Lydia will enjoy her Stampin' Up journey & I look forward to showcasing some of work shortly. If anyone would like to know more about the benefits from joining Stampin' Up or would like to share our creative journey then please get in touch. Well I best go & get the camera out to start gathering together the projects from yesterdays experience day to sare with you later.
I also have added some more retired Stampin' Up stamp sets to my for sale section if your interested drop me an e-mail, if you need pictures then they can be found in the gallery at Splitcoast stampers or send me your e-mail address & I will take pictures of any that you are interested in.
Dont forget to check back over the next couple of days to see what we made on Saturday.
Posted by
Lavender stamper
on
10:18
0
comments
Friday, 2 July 2010
Another one that didn't make the final selection
Posted by
Lavender stamper
on
11:08
0
comments
Labels: box, Flight of the butterfly, Template
Thursday, 1 July 2010
Stampin' Up experience day ~ Have you booked your place?
Posted by
Lavender stamper
on
20:12
0
comments
Labels: Stampin' Up experience day
Bird on a branch
Posted by
Lavender stamper
on
11:00
0
comments
Labels: Bird on a branch
Tuesday, 29 June 2010
Welcome back Dan
Welcome back Dan
Dan has just come back from 10 days in Scotland with Allan, they certainly didn't sit around & made the most of their time.
The first picture is of the mirror people in the grounds of the David Marshall Lodge
Can you see the face in the second picture?
Aw & this one is so cute & I just have to share it with you.
Dan took over 400 pictures & has edited his favourite 60 & added them to his Flickr account, if you click on any of the above photo's you will be directed to the larger versions of the pictures, or click here to go to the Flickr set.
Posted by
Lavender stamper
on
19:04
0
comments
Labels: Photo gallery
Monday, 28 June 2010
Can you guess what this is made from?
I used the big bite cropodile & it went through the metal baking sheet like a hot knife through butter.
Posted by
Lavender stamper
on
19:36
0
comments
Labels: 3D items, Sweet Pea felt flowers, sweet pea papers
Thursday, 24 June 2010
Vintage Vogue feature
Have you seen this months issue of the Making cards magazine? The July Issue has a feature using the lovely Vintage Vogue stamp set & they ise the kissing technique.
The kissing technique is a great way to get more use from your stamps. There are several different ways to use this technique:
Take a background or textured stamp and ink it with a dark color. Place it face up on your work surface. Then ink a solid stamp with a lighter color. Press the solid stamp into the background stamp so that they “kiss” each other. The background stamp leaves a pattern into the solid stamp. Then take the kissed solid stamp and stamp onto cardstock.
As a variation, ink the two stamps in coordinating colors, rather than a lighter shade of the same color, and “kiss” them together. Then press the solid stamp onto cardstock.
Ink a solid stamp and “kiss” it with an un-inked pattern stamp. This removes ink in the shape of the pattern. Stamp the kissed solid stamp onto cardstock.
Posted by
Lavender stamper
on
08:05
0
comments
Labels: Technique, Vintage vogue
NEW stampers 6 group starting
Heres the deal!!
*
I need 6 ladies to join the club who commit to spending a minimum of £25 a month (plus P&P) for 6 months September - March. This is without a December meeting, which I can do ( If required ) as an additional meeting with a draw for hostess, so the chance of a bonus hostess month.
*
Each month one of the 6 ladies will be classed as the "hostess" for that month and will receive freebies of the minimum of a Level 1 stamp set and £15 worth of goodies from the catalogue. Dont worry being hostess simply means you get freebies that month, it doesnt mean you have to let us all come round to your house!!!!!
*
You will receive a free Stampin Up catalogue at the start of the club and any further mini catalogues that might appear during the club run.
*
Occasionally I will send out challenges and prizes to some lucky winners
Do you like the sound of it ???
Please mail me for more information or to register a place before they fill up !!!!!
Posted by
Lavender stamper
on
07:44
0
comments
Friday, 18 June 2010
Lemon tart
Ingredients
170g butter, cubed
4 large or 5 medium eggs, beaten
1 large or 1 medium egg yolk
220g unrefined caster sugar
375g frozen Cooks’ Ingredients All Butter Shortcrust Pastry, thawed (2 x 250g in one pack)
Method
- Roll the lemons on a work surface with the palm of your hand (to make them release more juice). Juice them and measure out 150ml. Place the juice, zest, butter, eggs and sugar in a saucepan over a low–medium heat and stir continuously for 10–15 minutes (do not allow to simmer) until the butter has melted and the sugar has dissolved. Increase the heat a little and stir until it begins to simmer; simmer for 5 seconds, then remove from the heat. Pass the mixture through a fine sieve into a bowl. Cover with clingfilm to avoid a skin forming. Place the bowl in the fridge to cool for 30 minutes.
- Roll the pastry between 2 sheets of clingfilm to a thickness of 2mm. It should be 10cm wider than the tart case. Preheat the oven to 180C, gas mark 4. Peel off the clingfilm, roll the pastry around a rolling pin, lift it over a 23cm tart case and unroll it so the edges hang over the sides. Press the pastry to fit the tin leaving the edges overhanging to trim after baking (this will ensure the tart case is unaffected by the pastry shrinking). Prick with a fork and leave to rest in the fridge for 30 minutes.
- Take a sheet of parchment larger than the tart tin and scrunch it up. This will make it easier to fit into the corners of the tart. Place baking balls or coins on top and place in the oven for 20 minutes.
- Remove the parchment and baking balls or coins and return the tart to the oven for 10 minutes until golden brown. Take the tart out of the oven and allow to cool completely before running a knife around the edge of the tin to remove the excess pastry. Carefully lift the tart case out of the tin.
- When cold, pour the lemon filling into the centre of the tart allowing the lemon curd to flow evenly to the edges. Place in the fridge for 1 hour before serving with crème fraîche and fresh raspberries if they are in season
Posted by
Lavender stamper
on
18:51
0
comments
Labels: Recipe
Thursday, 17 June 2010
Mini Pizza box & 4 vintage vogue cards
With my new stampers 10 starting this week I thought I would start with one of my favourite sets & a mini pizza box and 3 cards which include a mini easel card at Angie's request.
Stamps
Vintage Vogue 117690
Tiny tags 118091
Live your dream 111486
Step 1
Step 2
Turn cardstock, and on the 11" side of your cardstock, score at 1", 5”, 6” and 10”.Step 3
Following the scored lines along the 11” side, use scissors to cut flaps.Begin cut on outer edge of paper and stop at the perpendicular scored line
Step 4
Adhere flaps to inside of box.Step 5
Decorate and fill box as desired.The finished box measures 4" in width and 1" in height
Variations
- Different Sizes To figure out the cardstock size you need for a different size box, try this formular" Cardstock width: 2 x height of box + finished box size Cardstock length: 3 x height of box + 2 x finished box size
Posted by
Lavender stamper
on
12:00
0
comments
Labels: box, Tutorials, Vintage vogue
Tuesday, 15 June 2010
The final pieces
After a busy year learning 2 completely new subjects the night of the 'A' level Photography exhibition is here. Its hard to believe that 14 months ago Dan had barely used a camera & yet tonight we have been to the exhibition which contains some of his final pieces. Dan first used a DSLR camera at last years race for life on the May day bank holiday weekend, and now this passion & enthusiasm has been converted to a 6th 'A' level.
Posted by
Lavender stamper
on
22:59
0
comments
Labels: Dan
Saturday, 12 June 2010
Making your own bunting
What you need
CardPencil/tailors' chalk
Ruler
Scissors (for cutting card)
Pinking shears or scissors suitable for cutting fabric
Fabric
Pins
Needle and thread/sewing machine
2m ribbon or cotton tape (wider than 2cm to make it easiest)
Iron
Step one: Make a template
To make sure all the triangles are the same size, cut a template from card to draw around. I reckon long triangles are better than short stubby ones.Step two: Draw the triangles
Draw around the template on to your fabric using a pencil or piece of tailors' chalk. Remember to rotate the template each time you draw another triangle so you can get as many pieces as you can from your fabric.Step three: Cut out the pieces
Use pinking scissors to cut around the triangles - this gives them a zigzag edge and stops the fabric from fraying. If you don't fancy investing in any new tools, use normal scissors to cut out and:a) Put up with the fraying (really, this isn't ideal).
b) Use felt - which doesn't fray - or strong upholstery material
c) Overlock around the edges with a sewing machine
Step four: Attach the triangles
Take a long piece of ribbon and fold it in half, lengthways, so it is just as long but half as wide. Iron to keep the fold in place (this makes the next bit easier). Pin the fabric triangles on to the ribbon at equal distances from each other.Step four: Sewing up
With the triangles pinned in place, sew all the way along the ribbon, at least 1cm from the edge, making that sure when you stitch, the needle goes through the triangle and both sides of the ribbon. A sewing machine makes this easy, but if you don't have one, hand-sew using a backstitch.
Posted by
Lavender stamper
on
19:47
0
comments
Creamy spaghetti with crispy bacon
You will need
- 300g unsmoked back bacon
- 400g mushrooms
- 200g young leaf spinach
- 150ml pot of single cream
- 500g spaghetti
- Onion
- garlic
- egg
- milk
Method
- Cook 400g spaghetti, following pack instructions.
- Meanwhile, fry the unsmoked back bacon, cut into strips, over a medium heat for 5 minutes until browned and crispy. Remove from the pan and set aside on a plate.
- Fry the mushrooms, sliced, 1 onion and 1 clove garlic, peeled and sliced, for 3–4 minutes in the oil left in the pan from the bacon. Return the bacon to the pan and add the spinach leaves, 1 egg yolk, 75ml single cream and 75ml milk, and stir well until heated through.
- Remove from the heat, add the cooked spaghetti and stir through to serve.
Posted by
Lavender stamper
on
14:16
0
comments
Labels: Recipe
You never know
May catch a dream from you.
You never know when a little word,
Or something you may do
May open up a window
Of the mind that seeks the light
The way you live may not matter at all...
But you never know - it might.
That another's life through you.
Might possibly change for the better
With a broader brighter view.
It seems it might be worth a try
At pointing the way to the right.
Of course, it may not matter at all,
But then again it might.
Posted by
Lavender stamper
on
07:15
0
comments
Labels: inspiration
Friday, 11 June 2010
Life
Life could be fashioned and worn like a gown;
I, the designer, mine the decision
Whether to wear it with bonnet or crown.
Life should be made of the rosiest hue -
Something unique, and a bit out of fashion,
One that perhaps would be chosen by few.
Someone questioned the ultimate cost;
Somebody tangled the thread I was using;
One day I found that my scissors were lost.
Somebody said I'd be tired ere 'twas worn;
Somebody's fingers, too pointed and spiteful,
Snatched at the cloth, and I saw it was torn.
Wanting always to advise or condone.
Here is my life, the product of many;
Where is that gown I could fashion - alone?
Posted by
Lavender stamper
on
08:13
0
comments
Labels: inspiration
Thursday, 10 June 2010
Work in progess at the moment is yet more bunting at the moment I am making up some bunting I've called Strwberries & cream. The fabric in the machine is a michael miller fabrics called Sandi Henderson - Meadowsweet - Strawberry Fields - Cream.I have now hit a slight hiccup as all of the other fabrics I originally gathered for this project were from the Nicey Jane range by heather Bailey & now I'm not so sure that they all look right together as they are predominately pinkier than the Strawberry fabric I have based the project round.
So I'm wondering weather to use
Plain cream
Plain red
Red Gingham &
Green Gingham
If anyone has any suggestions Please e-mail me.
My little Janome machine is the 140M model & is just so cool, especially for just £40.
Posted by
Lavender stamper
on
17:44
0
comments
Labels: Sewing
New fabrics have just arrived
For the past week I have been stalking the postman, well thats the way it feels, just over a week ago I ordered these beautiful Riley & Blake fabrics from America to start making Halloween bunting & today they have arrived. Just one more pack to come & I can start the halloween bunting. I dont know wether to use black tape or to dye some lime green, or orange maybe, what do you think?
Posted by
Lavender stamper
on
17:06
1 comments
Wednesday, 9 June 2010
Flea market bag ~ Home sewn of course
Posted by
Lavender stamper
on
16:42
2
comments
Labels: Sewing
Sunday, 6 June 2010
Italian Sausage Spaghetti
Ingredients
Italian sausages
- 1 large Italian sweet sausage
- 1 large Italian hot and spicy sausage
- 1 yellow onion, chopped
- 2 cloves of garlic
- 3/4 large (28 oz) can of whole tomatoes
- Olive oil
- 1 lb (16 oz) spaghetti pasta
- Salt
- Grated Parmesan cheese
Method
The Sauce:Take the Italian sausage meat out of the sausage casings. Break up into pieces and mix the sweet and spicy sausage meats together. Brown the sausage meat in a large skillet on medium high or high heat with a little olive oil. In a separate skillet sauté the onions and garlic until the onions are translucent. Purée the tomatoes in a blender, add to the skillet with the sausage meat. Add the cooked onions and garlic.
The Pasta
Fill an 8-quart or larger stock pot at least half full with water and bring to a boil. Add a tablespoon of salt. Slowly add the pasta, stirring to prevent clumping. Allow the water to come to a boil again. Cook, uncovered, with a fairly vigorous boil, for as long as the directions on the pasta package say, usually about 10-12 minutes. When pasta is al dente (cooked but still a little firm), remove the pot from the heat. Add a cup or two of cold water to the pasta to stop the cooking. Drain the water from the pasta through a colander. Place the pasta in a serving bowl.
Serve immediately. Garnish with grated Parmesan cheese.
Serves 4-6.
Posted by
Lavender stamper
on
20:51
0
comments
Labels: Recipe
Crafts are here
Crafts are here, crafts are there,
My craft supplies are everywhere.
I really should clean this mess,
but I like it I confess.
Floor is littered, chairs are piled,
Kitchen's looking pretty wild.
On the table, counter too,
Seems that any place will do.
Hall is stacked with cartons high,
filled with things folks like to buy.
Garage is full, but so far....
there's still room to park the car.
I never have an idle day,
New ideas come my way.
Don't know yet what I'll create,
but my imagination's great.
My family smiles, they don't complain,
although at times I am a pain.
but when all is said and done,
I really am a crafty one!
I"ve been visited
| Visit the hit counters gallery. |