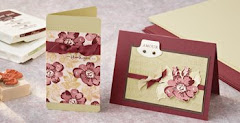
Well as promised here are some of the wonderful swaps I received at convention, this is a very photo intensive page so I suggest you grab a nice cup of tea & some biscuits & enjoy.
Monday, 22 November 2010
Convention swaps Day 1
Posted by
Lavender stamper
on
06:57
0
comments
Labels: Convention, Stampin'Up swap
Sunday, 21 November 2010
Convention Swapping
Well the theme of convention & part of the Stampin' Up ethos is about sharing. What better way to share what we love is to make swap cards to swap with other demonstrators throughout Europe.
I have to say that 24 hours before I left for convention I had just 2 swaps completed , yes that was what I said just 2 in my defence I did have everything cut & ready to assemble, that bit had taken me two weeks to get to that stage. I was getting frustrated because as you can imagine I am not just a creative coach for Stampin' Up & I was rapidly running out of time.
With a little help from DH & Abi I managed to finish 65 cards to swap.
Here is my Swap card
The card is 4" square the base is chocolate chip cardstock. The next layer is very vanilla & that was stamped with the En francais stamp in Crumb cake ink, the layer was then torn for the aged look. The border is Old olive cardstock punched with the scallop trim border. The whole of the base layers was spritzed with Champagne frost that is mixed in a spray bottle with isopropyl Alcohol & then lightly shaken before spraying.
The bird & scallop oval are punched from Bashful blue cardstock. The birds wings are Bashful blue card stock stamper with the Bella toille stamp before being punched & the branch was punched with Wild Wasabi.
I will upload some pictures of the swaps I received over the weekend for you to see what a beautiful tallented bunch the european demo's are.
Posted by
Lavender stamper
on
06:58
0
comments
Labels: Bird Punch, Convention, En francais ~ Background, Stampin Up swap
Saturday, 20 November 2010
Ribbon Tree
After making my paper strip Christmas tree I thought I would tree & make a ribbon tree like the one I saw here in blogland 12 months ago, incidently that is when I bought the polystyrene cones to make the tree's.
This tree was a little simpler to make.
1. Paint the cone with either brown or green paint & set aside to dry, by doing this is the strips of ribbon dont completely overlap you don't see the white cone.
2 Cut your strips of ribbon into 4" lengths, I did mine in a random organised pattern but you can just mix them up . The tree that inspired me was made from all oddments and looked amazing & jewel like.
3. Starting at the bottom about an 1 1/2" up from the edge start pinning the ribbon pieces with both edges together.
4. After completing each row, start the next row slightly offset.
5. Carry on until you get to the top.
6. Using a matching cardstock cut 1 1/4" circle using a punch. Cut a slit to the middle & make a wide cone, like a mandarin hat, glue together using a wet glue like tombow, I use a mini bulldog clip to hold glued items together.
7. When the little cap is thoroughly dry I glued it over the top of the cone before gluing on my droopy bow to finish the top of the tree. I have used a cool melt glue gun for this.
The Pot
The decorated pot is made from a small terracotta plant pot.
1. I painted the pot with antique cream acrylic paint, it did take 2 coats for an even coverage.
2. I then stamped the snowflakes in Real red ink onto white tissue paper & set aside for a few moments to dry.
3. When the stamped images are dry, I highlighted areas with the Platinum frost paint using a blender pen & again set aside to dry & trimmed closely.
4. Using the decopatch glue I coated the area of the pot I wanted to place the snowflake on. Place snowflake on the glued area. & coat with decopatch glue & smooth flat with the glue brush, repeating until the pot is decorated & completely covered in glue.
Assembly
To assemble the tree I painted a pencil with acrylic paint & carefully pushed it into the polystyrene of the tree.
Inside the pot I put some oasis into the pot & put the pencil into the oasis, Once it was assembled & I was happy it was straight I added a spot of glue to keep it stable.
Posted by
Lavender stamper
on
06:35
1 comments
Labels: 3D items, Christmas 2010, Serene Snowflakes
Friday, 19 November 2010
Pre ~ convention party
Monica held a pre- convention party on the night before the convention started, this was the first time that I had met Monica & she is a human Whirlwind in the loveliest way possible. The party ran so smoothly we had a handmade goody bag, a quiz, lots of swapping and some make & takes.
It was a lovely evening & a great ice breaker to prepare us for the craziness of the next day at convention. I have already added some of the pictures from Monica's inspiration boards.
So here are the the make & takes that we did.
The first one I made was 6 x 6 scrapbook page.
The second was a cute Christmas card
Posted by
Lavender stamper
on
06:23
0
comments
Labels: Convention
Thursday, 18 November 2010
My stampers 10 Ladies
My lovely stampers 10 ladies are so creative.
Last month when we met I set them a challenge to make a Christmas item that was NOT a greetings card, It had to be 3D & of course it had to contain a Stampin' Up product & not just Tombow glue.
On offer was a £15 Stampin' Up voucher to spend with me, so basically if you rise to my challenge your name goes into the draw for the voucher.
Lucy was inspired by Monica to make this beautiful pendant, she realised after she had made it that I had specified it must be a Christmas item, so creatively she made a 3D stand of a Christmas tree.
![]() |
| By Lucy |
Lucy used Occasionally ( Retired ) Tiny Tags set & True Friend ( Retired ) The pendant is made from a domino.
Kate made the cutest snowman, can you guess what she is made from?
![]() |
| By Kate |
![]() |
| By Alice |
Thank you to all that took part, The winner of the £15 voucher was Kate, chosen at random during the evening.
Well done kate
Posted by
Lavender stamper
on
18:45
0
comments
Labels: A jolly Holly Christmas {Retired}, Christmas 2010, Occasionally {Retired}, Stampers 10, Tiny tags ~ Stamp Set, True friend {Retired}
Table top Christmas tree
I am busy putting the final touches to my two Christmas events. I have two special evenings planned for my stampers 10 & stampers 6 groups. The dates for these are Monday 6th December or Thursday 9th December at 7pm.
Whilst searching for inspiration I came across these table top tree's, so I decided to have a go.
Posted by
Lavender stamper
on
06:01
0
comments
Labels: 3D items, Christmas 2010, Stampers 10, Stampers 6, stampin' up 3d project
Wednesday, 17 November 2010
Gift card holder
Another fellow Uk demonstrator was on-stage at convention to share some of her beautiful creations with us and that was Jules Who came 4th in demonstrator of the year for 2010. Check out her blog and you will see why she is just so inspiring.
When Jules was on main stage she made us laugh as she was such a natural with Chris her cameraman it was a comedy duo, but seriously she made this really cool gift card holder.
I couldn't resist so here is my version of the card holder
Crumb cake Cardstock measures 4" x 11"
Score at 2 3/4" ~ 4" ~ 5 1/4" ~ 8 1/4"
![]() |
| Be very careful when gluing, making sure that you only glue the three edges where I have marked. |
![]() |
| Once glued leave to dry |
![]() |
| Using a gift card mark either side of the card with a pencil, so you know where to punch. |
![]() |
| Using the word window punch make a whole all the way between the two lines. |
Designer series paper 4" x 2 3/4" From the Simply Scrappin' Christmas Jingle set
Punches used are the word Window punch & scallop border trim punch
The stamps are from delightful decorations and occasional greetings, Both images are stamped in Real red ink & the bauble is decorated with the lovely bling rhinestones from the current catalogue.
http://juliesjapes.blogspot.com/2010/11/my-convention-presentation.html
All of the above product is made by Stampin' Up & is available to purchase through me as an independent creative coach.
Posted by
Lavender stamper
on
06:57
0
comments
Labels: Christmas 2010, Delightful decorations, Occasional greetings ~ Stamp Set, Simply Scrappin' Christmas Jingle
Tuesday, 16 November 2010
Packing tape & Dazzling Diamonds
I often wonder how some of the bizarre techniques come about! This isn't bizarre but very easy & straightforward, I can see how this was easy to devise. I do however wonder what people were doing or even thinking when the devised the shaving foam technique, or the baby wipe technique or indeed the floor polish technique.
For this card you need some clear parcel tape & dazzling diamonds glitter.
The measurements for this card are
Card base Very Vanilla 3 3/4" x 3 3/4"
Layers
Real Red 3 1/2" x 3 1/2"
Basic black 2 1/2" x 2 1/2"
1 x post it note
Scallop Border trim punch
1/4" circle punch
Ornament punch
Crystal effects
Dazzling diamonds
Tombow glue
Clear Parcel tape
The alternative colour ways are Rick Razzleberry & melon mambo or pacific point & Baja Breeze.
The greeting inside the card is stamped onto very vanilla Cardstock & punched out using the oval punch with a co-ordinating mat punched using the scallop oval punch
The pictures do Not do show how dazzling these cards are.
All of the above products with the exception of the clear parcel tape are from Stampin' Up & are available to purchase through me as an independent creative coach.
Posted by
Lavender stamper
on
06:03
1 comments
Labels: Christmas, Crystal effects, Dazzling Diamonds, Delightful decorations, Scallop trim border punch
Monday, 15 November 2010
Stampers 6 project
On the Monday before I headed off to convention I had my stampers 6 group and we made some lovely little divided boxes to fill with decorated sweets & gift tags.
I had a sheet on the box project which we all made together and I showed my ladies how to make quick & easy decorated sweets using the Elizabeth Shaw mint crisps. Then using all of the leftovers from The Simply Scrappin' Christmas jingle set the ladies then made & decorated tags of their own using Delightful decorations & Sparkly & bright stamp sets. The punches are the tag punch, large tag punch & the ornament punch.
![]() |
| The mini chocolate bards on the left of the picture are Dairy milk miniatures, the type that go in Children's chocolate machines at Christmas & they are £1 for 20 |
All of the above product with the exception of the chocolates is made by Stampin' Up & is available to purchase through me as an independent creative coach.
Posted by
Lavender stamper
on
12:53
1 comments
Labels: Christmas 2010, Delightful decorations, Simply Scrappin' Christmas Jingle, Sparkly Bright, Stampers 6
Scrapbook House
Finally I have arrived in my craft room.
What a busy week last week was with viewing 6th forms & work I don't think I sat down until Thursday. I don't think that it helped as I had a major blitz of the craft room, airing cupboard & then decided I needed a bedside table!!! Simple enough request you may think, but not in this house. We have been living in our house now for 5 years & we are slowly getting the house how we want it. I must confess to hating the house for the first 18 months that we lived here. It was a newly built house and week after week we had builders in & out with there trusty mastic guns to fix the ever lengthening faults list, well I digress. Two years ago following up on a census our house was chosen to be surveyed by a government surveyor, where we found out that although we have 4 bedrooms, my craft room is not large enough if we wanted to let it out as a bedroom & our room is only 1" over the legal measurements for a double bedroom. Can you see the problem here? With fitted wardrobes the only option & they had to have folding doors, we are extremely challenged for space. So yesterday DH thought he would move the bedroom around into the only other position it would fit so I could have a bedside table. Well he managed it & now I have space for a bedside table, although it will have to be a small one.
So all week I have been full of inspiration but I have only just made it into the craft room
Whilst I was away at the recent Stampin' Up convention I was very fortunate to see some very inspiring demonstrators on the main stage, one of these was a fellow UK demo called Michelle Last, Her blog is wonderful so pop over and see some of her creations.
My Inspiration
One of the projects that Michelle shared with us was the mini scrapbook houses using this template
Roof panel measures 14cm x 9cm
For my house I have used the card stock & the papers from the Simply scrappin' Christmas Jingle kit & have made a little house to give as a Christmas card, inside the roof panel I've stamped a greeting from the occasional greetings stamp set, I will also use this to write my message.
Just a note, it is easier to stick your ribbon onto the base card layer before covering both sides with the designer series papers, it is much stronger & tidier.
![]() |
| Ready to decorate with some pictures of our Christmas preparations |
This will be one of the projects that I am making with my stampers 10 & Stampers 6 groups on our optional December meeting.
There are two sessions Monday 6th December at 7pm & Thursday 9th December at 7pm.
be sure to let me know which session you would like to attend.
All of the product used in this project is available from Stampin' Up & can be purchased through me as an independent creative coach.
Posted by
Lavender stamper
on
06:35
0
comments
Labels: A jolly Holly Christmas {Retired}, Christmas 2010, Mini Book, scrapbooking, Simply Scrappin' Christmas Jingle
Saturday, 13 November 2010
Christmas Wish List ~ How would you like your Christmas stocking filled with Stamping stash?
Posted by
Lavender stamper
on
19:43
0
comments
Crafts are here
Crafts are here, crafts are there,
My craft supplies are everywhere.
I really should clean this mess,
but I like it I confess.
Floor is littered, chairs are piled,
Kitchen's looking pretty wild.
On the table, counter too,
Seems that any place will do.
Hall is stacked with cartons high,
filled with things folks like to buy.
Garage is full, but so far....
there's still room to park the car.
I never have an idle day,
New ideas come my way.
Don't know yet what I'll create,
but my imagination's great.
My family smiles, they don't complain,
although at times I am a pain.
but when all is said and done,
I really am a crafty one!
I"ve been visited
| Visit the hit counters gallery. |