The final all day event for 2012

Here are the dates for 2012 Experience days that Sharon & myself have organised.

Now Booking

Saturday 1st December at Hethersett Village Hall for the last all day event of 2012 & a Christmas Card & gift event
Theme - A whole day crafting
Cost - £25

Future Dates:


Saturday 1st December ~ Christmas gift event

And don't forget for every event you attend you will receive a FREE raffle ticket which could win you a
BIG SHOT BUNDLE.

(Draw to take place during December's Event)

All DAYS HAVE VERY LIMITED PLACES SO BOOK NOW TO AVOID DISAPPOINTMENT. YOUR PLACE IS ONLY SECURED ONCE PAYMENT IS RECEIVED.


Do you fancy a catalogue party?

Did you know that you can qualify for hostess benefits without having to hold a party?

Just by showing your catalogue around to your family, friends or craft group, If you collect together orders totalling over £150 you will qualify for a free hostess benefits.

If your interested please contact me for further details.

Search This Blog

Contact me

Stampin' Up Contact details I have set these business hours to preserve my home / work life balance.

Email ~ Anytime ~ lovellsinnorfolk@hotmail.co.uk
Or call me between 9.30 Am ~ 8Pm ~ 07092984580


Saturday, 1 October 2011

A treat with the new catalogues

This is what awaited my ladies when they arrived for this weeks Stampers 10 group. A note pad with their initials the alphabet is Broadsheet. A note peg again with their initial & of course a wish list sheet.

Broadsheet Alphabet 118724 wood mount £44.95 120585 Clear mount £36.95
The papers are from the new catalogue in the pack you get two of each sheet of the double sided papers plus two sheets of the laser cut doilies 1 in Pumpkin Pie & 1 in Melon mambo.
122360 Flirtatious £11.50
The pads are very easy to cover & only take about 10 minutes each but all of my ladies loved them, some were so busy playing with the Kitten that they didn't even notice the new catalogues & pads.


I am now looking at a slightly different design for my Stampers 7 ladies as they've probably seen this post & I do like a little surprise so I wont blog them until after I see my ladies on the 10th.


New In Colours

Have you flicked through the new catalogue yet? 
If you have then I'm sure that you will have found the New in colours on page 2

  • Calypso Coral
  • Island Indigo
  • Lucky Limeade
  • Pool Party
  • Wisteria Wonder.
Whats your favourite combination?

The above In colours are available in Ink Pads, Pens, Reinkers, Ribbons, Card stock, Paper Stack & Brads.

Also worth a mention that each re-inker is now available to purchase separately.


My first purchase from the new catalogue

Hey Crafters! 
Well, it's my favourite time of year, the release of the new Stampin' Up! Idea Book and Catalog! I love October for that reason alone! I spend days checking out the new products, drooling over the project samples and making my wish list! & remaking my wish list again.

122361 petite pennant builder  ~ punch


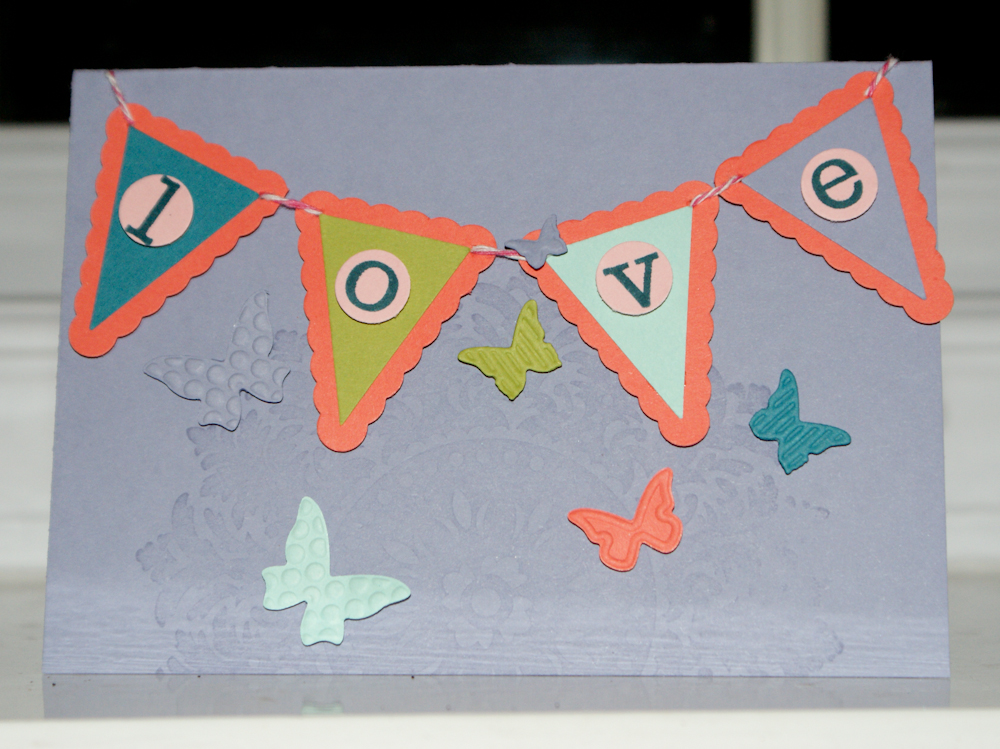
One of the first items I purchased is our new Petite Pennants Punch and I want to share my first project with you using that punch. The matching stamp set for this punch is Pennant Parade 122740 ( wood mount ) £20.95 122742 ( Clear mount ) £16.95
Pennant Parade 122740 ( wood mount ) £20.95 122742 ( Clear mount ) £16.95
So here are the first two cards that I've made with the stamps & Punch. The colours that I used in both projects are the new In Colours that have just arrived in the 2011 /2012 ideas book & Catalogue


So what do you love at the moment?

I love
  • My Family ( always )
  • The new In Colours
  • Stampin' Up Fabric
  • More Sizzix Dies
  • The weather at the moment, despite having to work today
  • Embosslit dies
  • Pennant parade stamps ~ As one of my other business's is making fabric bunting.
  • All of the Designer series papers Especially the Neutrals stack
  • My Ipad 2
  • Halloween stamps & papers ~ Thanks for listening Stampin' Up
  • The new hostess pounds & all of the lovely new hostess sets
  • So many new verses sets to choose from
  • Paisley petals stamps & papers
  • Aviary stamps
  • It's a wrap occasions ~ just need to find Chocolate that fits the wrappers
  • Creatively yours ~ so many uses as I now do more than just paper crafting
  • Scallop dots ribbon
  • Crochet trim 
  • Perfect pennants die again as I make fabric bunting this will be great
  • All my cats & Rosie Kitten ( even though she is very naughty at the moment )
Rosie 30th September 2011


So let me know what your Loving

Hostess Pounds & how to earn them.


With the new catalogue Stampin' Up have streamlined the hostess benefits making it possible for any hostess to now achieve any stamp set, the hostess benefits programme is called Hostess pounds. 

How do Hostess Pounds work?
Hostess Pounds can only be spent on the products in the hostess section of the catalogue AND in the remaining pages of the catalogue. The hostess section features exclusive stamps sets which can only be earned when hosting a workshop or joining one of my stampers 6 / stampers 10 groups or by placing a qualifying order over £150
Each product in the hostess section will have a hostess value next to it. This will indicate how much of your pounds you will spend if you select that particular set.
The great thing is, if you were to select a stamp set that is £45 hostess pounds, you can still own that set by paying the additional £5. How great is that?!

If your Interested in Earning Hostess pounds then contact me today or leave a comment on this post.

It's arrived

I know that many of you will share my excitement that today is the 1st of October, Its exciting for many reasons as well as the launch of the new Stampin' Up catalogue it is also World Card Making Day.

If you would like to share in my excitement here is the new catalogue for you to enjoy whilst enjoying your first cup of coffee of the day.

If you would like to view the catalogue online please click here
Orders can be placed from today.
There are lots & lots of lovely new products to inspire you, so please feel free to contact me if you have any questions.
I'm off to work in a bit so have a Happy Saturday, World Card Making Day & what ever you doing be creative.


Friday, 30 September 2011

Have you discovered Pinterest yet?

As many of you know about 4 weeks ago I ceased using Facebook, I do check for private messages each day as I know that many of you contact me through Facebook messaging.
I am amazed at how much more free time I have now i'm not playing Facebook games, worrying about the games others are playing or lurking in the background of peoples lives, most of whom if i'm truthful I would probably cross the street to avoid. That doesn't mean all of my facebook friends, because if you can still see me on facebook, thats because I choose to have you there, when I became disenchanted with FB I removed all of the insignificants in my virtual world.
I've strayed from the point a little but I was wondering where all my mojo had gone, why I was so tired and most importantly why I was allowing all of the negativity that Facebook breeds into my everyday life.
Since I have broken the addiction I have spent more time in my craft room creating, more time interacting with my family, my mood has improved so much, I even sit on the sofa every evening and watch at least on WHOLE television programme, which if you know me you'll know to be a major achievement. The tiredness hasn't improved but I do still manage to cram a lot into my day.
I do still use the internet for blogging....obviously and for searching for inspiration which is how I came to discover Pinterest.
Pinterest is an online pinboard that you can categorise and add any pictues that you find whilst surfing or blogging. The bonus is that it also references the source of inspiration, which is very important if you are going to use that source for inspiration and reproduce for blogging purposes, it's always lovely when people credit me for inspiring them.
Check out my Pinterest here http://pinterest.com/lavenderstamper/

Let me know what you think of pinterest or if you would like me to send you an invite.


- Posted using BlogPress from my iPad

Location:Norwich

Stampers group cards from September

This month I demonstrated the same cards at both of my stampers group, I usually demo two different sets of cards, I dont know why! But this month I introduced a new technique and a card suitable for the men in your life.
The new technique was a faux pearl background. The camera doesn't do this project justice as you cant really see how the pearl effect glistens.


To make the faux pearl background you need glossy white card 106555
* Using the direct to paper technique completely cover the glossier side of the card with ink, I used blushing bride ink. Dont worry if you cannot get completely even coverage or finger marks this wont show.
* Using shimmer paint, pour a small amount of frost white shimmer white paint onto a palette, I use a pringle lid.
* The next part is the easy and fun part. Screw up a food bag or a piece of cling film, then dip it into the paint and dab onto the glossy card until completely covered, dab and carry on until you get a mattled effect.
* Set aside to dry, when completely dry polish with some kitchen roll.

For this project I also used one of my favourite stamp sets Vintage vogue 117690 and the co-ordinating wheel Very vintage 117693.

The colours used are Crumb cake, Perfect plum, Blushing bride, Certainly celery & Very vanilla.
I've accesorised the card with Basic pearls, Clear rhinestone brads and Pretty in pink 3mm taffeta ribbon.

I love this background technique and I am now going to try it with some other colours maybe Cherry cobbler or Old olive for Christmas.

The second card that we did was relatively simple but I think that it's so effective.


The embellishment panel is made using the Nature walk stamp set 121925, the image was coloured with Stampin' write pens Garden Green and Pumpkin Pie. Using the colour spritzer tool and the Soft Suede stampin' write pen to add the speckled effect.
Using the Soft suede ink pad & sponge daubers gently edge the panel with colour to blend on the edges.
The colour combination used on this card are Night of Navy, Very Vanilla & More Mustard.
The backing papers used come from 2 Designer series paper patterns stack. Regals 117154 & Neutrals I have to say i've had the Neutrals stack 117157 for a few months and never got round to opening it up, well more fool me this is now my absolute favourite stack it is so versatile and an absolute must for Mens cards, Wedding cards and brilliant for scrapbooking as it goes with everything.


Just incase your wondering what the number is, its a specimen number that would be used for botanical / specimen reference.

Well thats all I have to share today, but check back over the weekend for some projects from the new catalogue which is available from tomorrow.

Happy crafting
Lisa

-Posted using BlogPress from my iPad

Location:Norwich,Uk

Saturday, 24 September 2011

Finally I think I may have the hang of this

Well i have managed to sucessfully blog for 3 years, I have managed to create a blog post from my iphone and now I have ventured onto the ipad and am trying my first blog post with pictures added pictures and edited them on the ipad using Photoshop express.
To be quite truthful I cannot believe just how easy the whole process is and so quick.

Well enough waffle about my new toy, despite decorating Abi's bedroom and having her chaos spilling out into my craft room I have managed to make a project to share.
Here is the mini wreath i've made. The papers are sadly sold out but I thought that the project was too cute not to share with you.


To start this project you need to make a ring from thick card, this forms the base of the wreath, rather than cover this with paper I painted it using a cream acrylic paint. Although you cant see it from the front I rolled the edge in a versamark ink pad and then sprinkled the edges with gold embossing powder that gave a lovely vintage edging.
The next step was stamping onto the ribbon, I used the basic black ink pad & the stamp a ma jig. Then stretched the ribbon across the middle of the wreath, securing with sticky strip.
The stars are cut from real red card and then stuck onto the stars cut from dsp. Using a glue pen & dazzling diamonds glitter glitter just around the edges on all but 5 stars. The remaining 5 stars were completely covered with versamark ink and sprinkled with heat & stick, heated and them completely covered with dazzling diamonds.
The whole wreath was assembled using ahot glue gun, this probably isn't necessary in a normal household without an inquisitive kitten.

Well I hope that you've enjoyed my first blog post complete with spelling mistakes from the ipad.

Posted using BlogPress from my iPad

Friday, 16 September 2011

Much excitement today

I now have another piece of technology to try and master as I took delivery of our new Ipad 2. I dont know how long it will actually take me to get the hang of using it, especially since i've had my i-phone since june and am still finding new features and new app's almost daily, i love my phone so I hope that the next blog post will be sent using my new I-pad, just dont look to closely at the spelling, its not me its the I-phone, well thats what i blame it on. Wish me luck as I go and try and fathom it out and resist playing a few games along the way.
Thank you Paul for buying the raffle tickets to win the I-pad.


- Posted using BlogPress from my iPhone

Thursday, 15 September 2011

One Sheet Wonder ~ Part 2

Well as promised two more cards using up the leftovers from the A5 One Sheet Wonder background that I made this morning.
This time I've made two A6 cards using bashful blue card stock I think these really compliments the colour palette I started with today.


Supplies for these projects
Inks
Perfect plum
Pretty in Pink
Concord crush
Rich razzleberry
Cardstock
Bashful Blue
Perfect plum
Whisper White
Concord Crush
Rich Razzleberry
Tools
Decorative Label punch
Heat Tool
Paper trimmer
1/2" Circle punch
3/4" Circle punch
1" Circle punch
1 1/4" Circle punch
1 3/8" Circle punch
Scallop Circle punch
Decorations
Dazzling Diamonds glitter
Basic Rhinestones
White Gel pen
Sticky Strip
3/8" Very Vanilla taffeta ribbon
Linen Thread
Brights Designer Buttons
Stamp Sets
Serene Snowflakes
Contempo Christmas
Four Frames ~ 2011 Mini
Curly Cute
Gifted ~ retired September 2011


One Sheet Wonder

One sheet Wonder, I wonder how many of you have heard that phrase & have wonder what exactly is that?

Well to start a one sheet wonder you need to make either an A4 or A5 sheet of backing paper which you will use for a whole project.
For this backing sheet I used the Serene Snowflakes Stamp set & four coloured ink pads In Perfect plum ( A colour I don't use enough) Pretty in Pink, Rich Razzleberry & Concord crush.

Also I decided with this project to make small cards. I worked out that from a single A4 sheet of card you can make 2 4" square cards & a single 3 1/2" x 3 1/2" Square card, so here they are.

3 1/2" x 3 1/2" Square card
A neat trick for making a glittery border is to make lines using the Sticky strip & cover it with the Dazzling diamonds glitter, This also works as a frame around a square or rectangular aperture. It does look really blingy but I cannot seem to get good light today to take a decent picture.

4" x 4" Square Card

4" x 4" Square Card

Supplies for these projects
Inks
Perfect plum
Pretty in Pink
Concord crush
Rich razzleberry
Cardstock

Perfect plum
Whisper White
Concord Crush
Rich Razzleberry
Tools
Decorative Label punch
Heat Tool
Paper trimmer
1/2" Circle punch
3/4" Circle punch
1" Circle punch
1 1/4" Circle punch
1 3/8" Circle punch
Ornament Punch
Decorations
Dazzling Diamonds glitter
Basic Rhinestones
White Gel pen
Sticky Strip
Stamp Sets
Serene Snowflakes
Contempo Christmas
Four Frames ~ 2011 Mini
Curly Cute
Gifted ~ retired September 2011

Well after making those three cards from an A5 piece of " One sheet Wonder" background I still have a few pieces left over.
I will have a go at a couple more cards this afternoon.


Wednesday, 14 September 2011

August Stampers 10 projects

Another late update, I cant believe I have nearly managed to catch up with all of my overdue blog posts.

Here are the two cards that the stampers 10 group made in August.


Supplies for this card
Cardstock
Very Vanilla
Pretty in Pink
Marina Mist
Ink
Certainly Celery
Tools
Perfect Polka dots embossing Folder
Sizzix Big Shot
Scallop Envelope Die
Round tab punch
Papers
Springtime Vintage Designer Series papers
Decoration
Pear Pizzazz Seam binding


Supplies for this card
Cardstock
Very Vanilla
Poppy Parade
So Saffron
Ink
Poppy Parade
So Saffron
Peach Parfait
Old Olive
Tools
Stamp a ma jig
Circle cutting Template ( Non Stampin' Up )

Sponge daubers
Decoration
Dazzling Diamonds glitter

Another stampers 10 card ~ Twisted Easel


Sorry I cant remember which month this is from, but I know I've not uploaded it yet.


Supplies for this card
Cardstock
Cherry Cobbler
Basic Black
Very Vanilla
Papers
Designer Series papers ~ Love Letters
Ink
Cherry Cobbler
Crumb Cake
Soft Suede
Tools
Top Note Die
Scallop Circle punch
Modern Label punch
Scallop Border punch
Sponge Daubers
Paper Piercing tool
Mat Pack
Jewellery tag punch
Decoration
Rhinestone brad
Stamps
Tiny Tags
Artistic Etchings
Notably Ornate


Well I think that's all my blog posts caught up!!

September Stampers 6 projects

Ooop's  Whilst playing catch up today I realised that I didn't post the September Stampers 6 projects, so here they are, a very diverse pair of cards.

Supplies for this card
Papers
Designer series paper stack ~ Regals patterned paper
Stamps
Nature Walk
Inks
Basic Grey
Stampin' Write pens 
Garden Green
More Mustard
Tangerine Tango
Early Espresso
Tools
Paper Piercer tool
Colour Spritzer tool
Scallop border punch
Stamp a ma jig
Clear mount blocks
Stampin' Dimensionals
Cardstock
Night of Navy
Very vanilla
More Mustard

Faux Pearl Background Technique
Supplies for this card
Cardstock
Very Vanilla
Perfect Plum
Certainly Celery
Crumb Cake
Glossy White Cardstock
Ink
Versamark
Perfect plum
Concord Crush
Blushing Bride.
Tools
Heat tool
Bird punch
Large oval punch
Modern Label punch
Fancy Flower punch
Paper Piercing tool
Sponge Dauber
Scallop Border punch
Decoration
White embossing Powder
Clear embossing powder
Basic Rhinestones
Frost White Shimmer paint
In Addition you will need 
A food bag
Something like a pringle tube lid to use as a palette

To make the Faux pearl background you will need a piece of glossy card.

  • Completely cover the glossy card with the blushing bride ink pad using a direct to paper technique, this needs to be completely covered but it doesn't matter if the colour is un-even.
  • Tip a small amount of the frost white shimmer paint onto a palette.
  • Scrunch up the food bag this will be your applicator to make the pattern.
  • Dip the food bag into the paint & apply to the pink glossy in a dabbing pattern, carry on until the pink card is covered ( but in a patchy way )
  • Leave to dry
  • Then using kitchen roll buff to a shine
  • This can be made using any colour ink pad, red & green would look great for seasonal projects.


Well that's another project uploaded what else can I find?


AU naturelle

Christmas Au Naturelle, Christmas using Crumb cake cardstock I could quite happily use the crumb cake for all of my Christmas projects, It goes with Everything.
What colours are you using this year?

Both of the cards in todays post are A6 if you have loads of cards to make this is the most economical size card to make as you get two cards from a single A4 sheet.

Supplies needed for these cards
Cardstock
Crumb cake
Very Vanilla
Early Espresso
Real Red
Ink
Soft Suede
Whisper white ( Craft )
Early Espresso
Real Red
Versamark
Stampin' Write pens
Stamps
Lovely as a tree ( I don't use this set enough )
Serene Snowflakes
Welcome Christmas
Gifted ~ retired September 2011
Tools
Stamp a ma jig
1 1/4" Square punch
1 3/8" Square punch
Heat tool
1/4" Circle punch ~ Retired
Decorations
Basic Rhinestones
Dazzling Diamonds
Heat & Stick powder.
The shimmer of this card is stunning & the photo really doesn't do it any justice.
To make the shimmer on this card I first stamped the Lovely as a tree image using Early espresso ink, using my Stamp a ma jig to make sure that the image was central as I had pre-cut the panels for this card.
Then I covered the whole panel with Versamark embossing ink using the ink pad directly onto the card.
Then sprinkled on a generous coat of heat 'n' stick powder, tipped off the excess & returned it to the pot & heated the card using the heat tool.
Quickly I covered the whole area with Dazzling diamonds whilst it was still tacky & sprinkled off the excess & carefully heated to set the glitter into the heat & stick powder.
This is a beautiful technique & works well with many images.

The Gifted Stamp set is retiring at the end of September 2011.

Tuesday, 13 September 2011

Managing to find some Mojo for Christmas ~ At last

Last week I was quite pleased with myself as I managed to make three Christmas cards in a spare hour that I had. I do have to say that they are only small cards, so don't get too excited.

The measurements of the 3 cards in this post are 4" square.
With these three cards I challenged myself to use the colour family that I seldom choose which is the Regals collection, I tend to go for the Brights since the colour renovation last October I Love the brights.

Supplies needed for these cards
Cardstock
Very Vanilla
Riding Hood Red
Early Espresso
Garden Green
Basic Black
Ink
Early Espresso
Riding Hood Red
Garden Green
Basic Black
Tools
Scallop circle punch
Stamp a ma jig
1 3/8" circle punch
Corner rounder punch
Large Oval punch
Sponge Daubers
Decorations
Basic Pearls
Basic Rhinestones
Love Letter DSP
Very Vanilla 5/8" Grosgrain Ribbon
Shimmer paint in Champagne mist used on the sponge daubers & also made into a shimmer mist using Iso-propyl alcohol.


Well i did say that they were only small cards but just by starting the Christmas cards it has given me the incentive to carry on & get prepared, especially as someone told me that there are only 15 weeks to go.

Related Posts Widget for Blogs by LinkWithin

Stampin' Techniques

Stampin' Techniques
Two step Stampin

Watercolouring

Masking

Markers

Rock n roll

Stampin' Pastels

Heat embossing

Crafts are here

Crafts are here, crafts are there,

My craft supplies are everywhere.

I really should clean this mess,

but I like it I confess.

Floor is littered, chairs are piled,

Kitchen's looking pretty wild.

On the table, counter too,

Seems that any place will do.

Hall is stacked with cartons high,

filled with things folks like to buy.

Garage is full, but so far....

there's still room to park the car.

I never have an idle day,

New ideas come my way.

Don't know yet what I'll create,

but my imagination's great.

My family smiles, they don't complain,

although at times I am a pain.

but when all is said and done,

I really am a crafty one!

I"ve been visited

link to free hit counter html code
Visit the hit counters gallery.

Guest book

NeoCounter