The final all day event for 2012

Here are the dates for 2012 Experience days that Sharon & myself have organised.

Now Booking

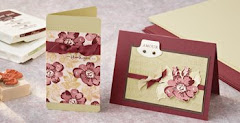
Saturday 1st December at Hethersett Village Hall for the last all day event of 2012 & a Christmas Card & gift event
Theme - A whole day crafting
Cost - £25

Future Dates:


Saturday 1st December ~ Christmas gift event

And don't forget for every event you attend you will receive a FREE raffle ticket which could win you a
BIG SHOT BUNDLE.

(Draw to take place during December's Event)

All DAYS HAVE VERY LIMITED PLACES SO BOOK NOW TO AVOID DISAPPOINTMENT. YOUR PLACE IS ONLY SECURED ONCE PAYMENT IS RECEIVED.


Do you fancy a catalogue party?

Did you know that you can qualify for hostess benefits without having to hold a party?

Just by showing your catalogue around to your family, friends or craft group, If you collect together orders totalling over £150 you will qualify for a free hostess benefits.

If your interested please contact me for further details.

Search This Blog

Contact me

Stampin' Up Contact details I have set these business hours to preserve my home / work life balance.

Email ~ Anytime ~ lovellsinnorfolk@hotmail.co.uk
Or call me between 9.30 Am ~ 8Pm ~ 07092984580


Showing posts with label Welcome Christmas ~ Stamp set. Show all posts

Thursday, 24 November 2011

Christmas wreaths

I have so many Christmas wreaths over the last couple of weeks I have absolutely no idea what I will put on my front door this year, When I was looking through a Christmas magazine in the shop yesterday i even saw an Eco wreath that was made out of sprouts, Not that I fancy one of those.


The wreath on these cards is from the Welcome Christmas stamp set, stamped whole it is a wreath but if you only stamp half of it across the top of the card then it makes a garland swag.
 A fake bow is a great way of adding texture to a card, by making a fake bow you use a lot less ribbon, but make sure if you are putting any kind of embellishment on a card that you take it to the post office to make sure that it fits through the slot & has the correct postage on it.
I always use fake bows on my cards, I can tie a bow but i'm never happy with it and always find the it sticks up at the wrong angle, I do also have a bow maker which does work, but is not very economical with the amount of ribbon you need, hence you wont ever see a hand tied bow on one of my cards.

Happy crafting until next time

Wednesday, 23 November 2011

Can you spot the Punch?

Did you spot the punches that I've used to create this cute card?


Did you guess?

The flames of the fire are made from the bird punch & a little less obvious the logs in the fire are made from the word window punch.
I love these two cards & they are very simple to make, The fireplace is embossed using the square lattice embossing folder. The wreaths are stamped before embossing, using the wreath from the Welcome Christmas stamp set, I did make the original sample in the wrong order & stamped the wreath after I had embossed the fireplace & it doesn't work, well they do say you learn something new everyday.


Until next time Happy crafting

Monday, 21 November 2011

Welcome Christmas

Welcome Christmas I love Christmas, especially the preparations before Christmas & now that a certain advert has been shown on television I know that Christmas will be upon us in the blink of an eye.

 The colour way for these cards is Cherry Cobbler, Crumb Cake & very vanilla. I love the vintage american look that this colour combo makes.
 Using the square punch to make the window frames is easy if you use a post it note to make a mask, ensuring that after punching the first hole you then place the mask securely on the card in line with the first hole, leaving enough space between the squares for the bars of the window pane.
To make the front of this card easier to construct I cut an additional front panel a fraction smaller than the A6 card & punched the window frame the same way as above. The window panels are made from acetate.

The Stamp set Welcome Christmas is one of my current favourite's I have seen some wonderful samples online so it it always seems to be at the top of the pile just lately when I'm making up my own Christmas cards & samples.

Until next time Happy Crafting

Thursday, 17 November 2011

Welcome Christmas ~ A new Favourite

What is your favourite stamp set? which set do you always reach for first?

With my Christmas card preparations well under way I seem to be favouring the Welcome Christmas stamp set. The two cards in this post are both made using the same main stamp from the set but both have a completely different look.

 Did you spot the stamp? the family Christmas scene.
The above card uses the fir tree from lovely as a tree as the branches to hang the baubles from.
The silhouette scene in this card is simply adorned with basic rhinestones.
The greeting is stamped twice, with the top of the greeting " Welcome Christmas" positioned under the top of the panel and the bottom of the greeting "Into your heart" positioned under the bottom of the card.
Just making an additional way that the greeting can be used.

Until next time Happy Crafting

Wednesday, 14 September 2011

AU naturelle

Christmas Au Naturelle, Christmas using Crumb cake cardstock I could quite happily use the crumb cake for all of my Christmas projects, It goes with Everything.
What colours are you using this year?

Both of the cards in todays post are A6 if you have loads of cards to make this is the most economical size card to make as you get two cards from a single A4 sheet.

Supplies needed for these cards
Cardstock
Crumb cake
Very Vanilla
Early Espresso
Real Red
Ink
Soft Suede
Whisper white ( Craft )
Early Espresso
Real Red
Versamark
Stampin' Write pens
Stamps
Lovely as a tree ( I don't use this set enough )
Serene Snowflakes
Welcome Christmas
Gifted ~ retired September 2011
Tools
Stamp a ma jig
1 1/4" Square punch
1 3/8" Square punch
Heat tool
1/4" Circle punch ~ Retired
Decorations
Basic Rhinestones
Dazzling Diamonds
Heat & Stick powder.
The shimmer of this card is stunning & the photo really doesn't do it any justice.
To make the shimmer on this card I first stamped the Lovely as a tree image using Early espresso ink, using my Stamp a ma jig to make sure that the image was central as I had pre-cut the panels for this card.
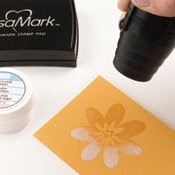
Then I covered the whole panel with Versamark embossing ink using the ink pad directly onto the card.
Then sprinkled on a generous coat of heat 'n' stick powder, tipped off the excess & returned it to the pot & heated the card using the heat tool.
Quickly I covered the whole area with Dazzling diamonds whilst it was still tacky & sprinkled off the excess & carefully heated to set the glitter into the heat & stick powder.
This is a beautiful technique & works well with many images.

The Gifted Stamp set is retiring at the end of September 2011.

Related Posts Widget for Blogs by LinkWithin

Stampin' Techniques

Stampin' Techniques
Two step Stampin

Watercolouring

Masking

Markers

Rock n roll

Stampin' Pastels

Heat embossing

Crafts are here

Crafts are here, crafts are there,

My craft supplies are everywhere.

I really should clean this mess,

but I like it I confess.

Floor is littered, chairs are piled,

Kitchen's looking pretty wild.

On the table, counter too,

Seems that any place will do.

Hall is stacked with cartons high,

filled with things folks like to buy.

Garage is full, but so far....

there's still room to park the car.

I never have an idle day,

New ideas come my way.

Don't know yet what I'll create,

but my imagination's great.

My family smiles, they don't complain,

although at times I am a pain.

but when all is said and done,

I really am a crafty one!

I"ve been visited

link to free hit counter html code
Visit the hit counters gallery.

Guest book

NeoCounter