The final all day event for 2012

Here are the dates for 2012 Experience days that Sharon & myself have organised.

Now Booking

Saturday 1st December at Hethersett Village Hall for the last all day event of 2012 & a Christmas Card & gift event
Theme - A whole day crafting
Cost - £25

Future Dates:


Saturday 1st December ~ Christmas gift event

And don't forget for every event you attend you will receive a FREE raffle ticket which could win you a
BIG SHOT BUNDLE.

(Draw to take place during December's Event)

All DAYS HAVE VERY LIMITED PLACES SO BOOK NOW TO AVOID DISAPPOINTMENT. YOUR PLACE IS ONLY SECURED ONCE PAYMENT IS RECEIVED.


Do you fancy a catalogue party?

Did you know that you can qualify for hostess benefits without having to hold a party?

Just by showing your catalogue around to your family, friends or craft group, If you collect together orders totalling over £150 you will qualify for a free hostess benefits.

If your interested please contact me for further details.

Search This Blog

Contact me

Stampin' Up Contact details I have set these business hours to preserve my home / work life balance.

Email ~ Anytime ~ lovellsinnorfolk@hotmail.co.uk
Or call me between 9.30 Am ~ 8Pm ~ 07092984580


Friday, 10 December 2010

Christmas Canvas

A few weeks ago whilst visiting Blog Land I came across a Christmas Canvas which inspired me to try one of my own, unfortunately I cant find the original post, so if you are the original creator I thank you for your Inspiration.

UPDATE ~ Many thanks to Dawn & Sheryl who pointed me back to the original blog that inspired me & an even bigger thank you to Fiona for the original inspiration I do love 3D canvases.
The original idea came from a demo at convention 2009 Jenni pauli


The canvas is 10" square & is pre primed. Then using the En Francais I attempted to stamp the background in Crumb cake ink. This was a lot harder than I had anticipated. But if you try this project don't panic as you can easily re-prime your canvas with white or cream acrylic paints or gesso. Eventually I had a few background images I was fairly happy with, So I set the canvas aside to dry whilst I started to make the buttons.
 I found that it is best to make the buttons in batches. yes I did say make the buttons, they are all made from Stampin' Up Cardstock, Circle punches, Tombow glue & Crystal effects with a sprinkling of Dazzling Diamonds.

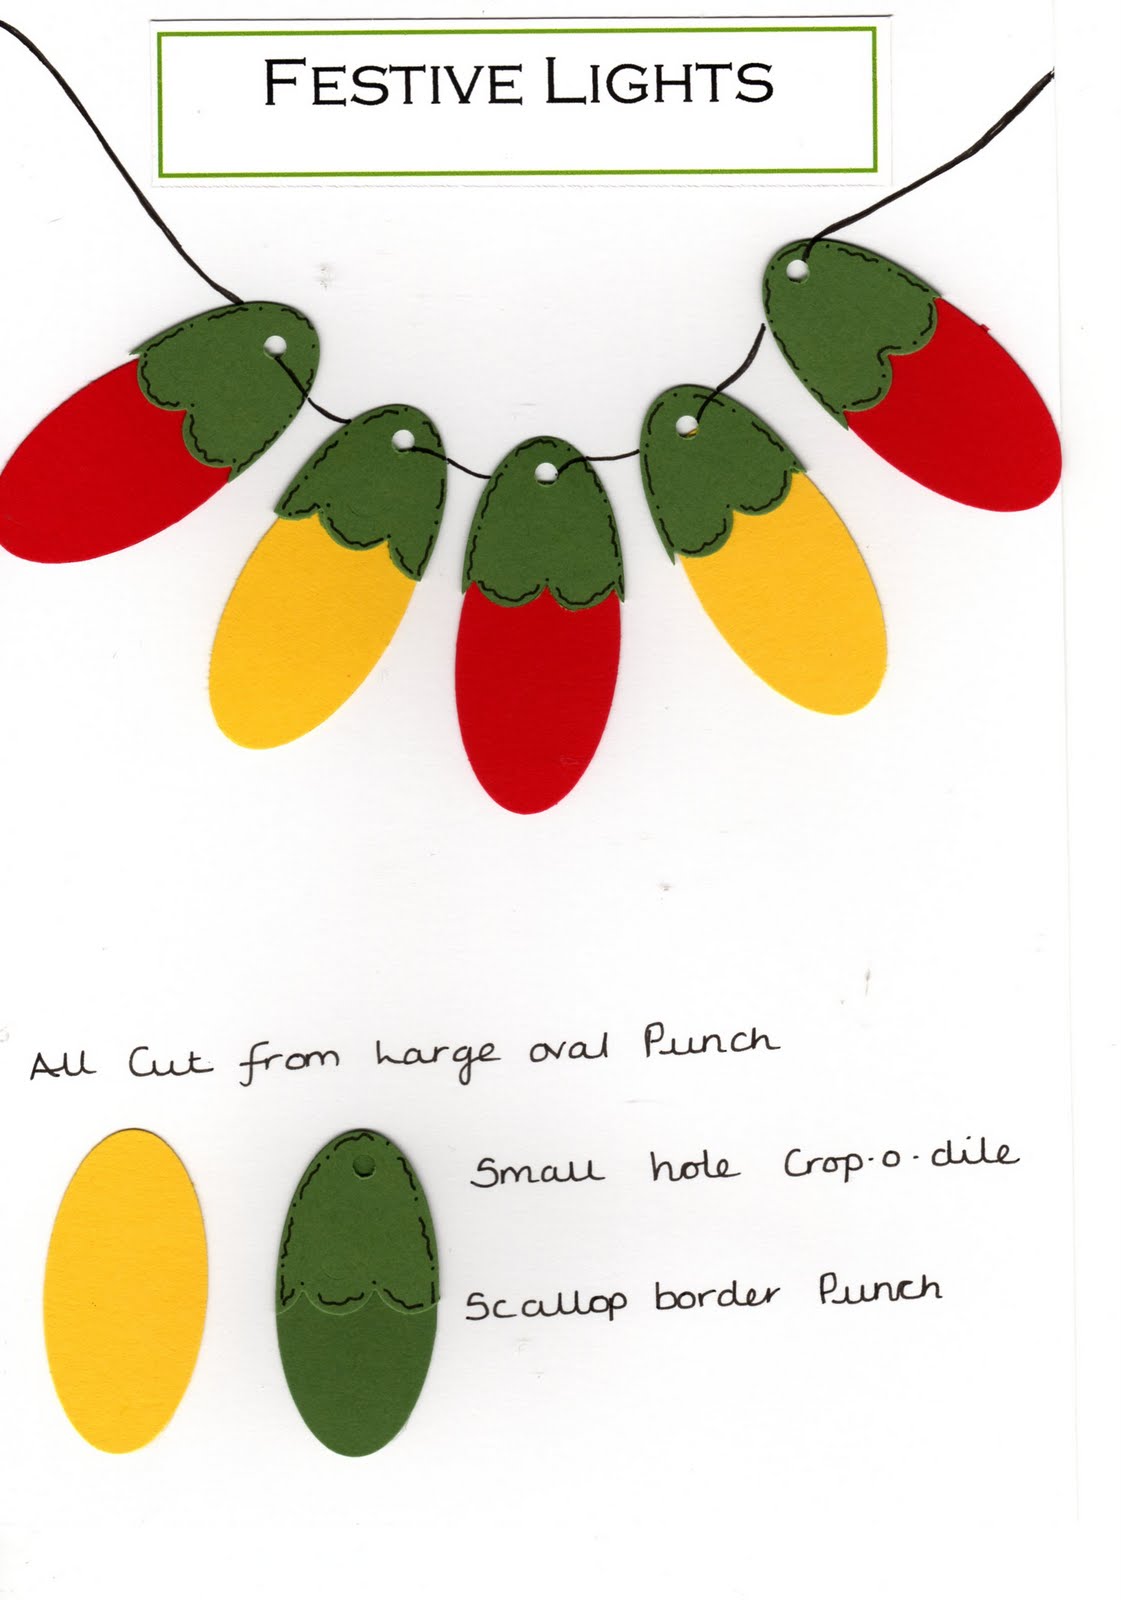
1. Punch out 3 circles for each button that you want to make. for this project you will need an assortment of sizes.

2. Punch out ( With space around the punched shape ) a size smaller circle.

3. Holding the original size punch up side down over the smaller hole, centralise the larger punch & punch a hoop.

4. Glue all four Layers together putting the hoop layer on top & leave to dry completely.

5.When dry use the crop o dile to punch the two button holes in the middle of the button. Repeat these steps until you have sufficient buttons for the project, I made more than I needed so I could use the spares on some Christmas cards.

6. On a non stick surface cover the buttons with Crystal effects, making sure not to shake the crystal effects as you don't want any bubbles, If you do get bubbles then use a pin to pop them before the Crystal effects dries.

7. A very light sprinkle of Dazzling diamonds enhances the buttons & then leave to dry completely, I left mine overnight.

8. Lay out the buttons on the canvas in a Christmas tree shape.

9. Thread ribbon or cord through some of the buttons to add texture before finally sticking the buttons in place. Again I used Crystal effects as the adhesive.


My Colours


Cardstock
Real Red
Chocolate Chip
Old Olive
Daffodil Delight

All of the above products with the exception of the canvas are available from the Stampin' Up range & are available to purchase through me as an Independent creative coach.

Wednesday, 8 December 2010

Beyond the page

I thought that I would try one of these corsages that I saw people wearing at the recent Stampin' Up convention, I didn't realise how easy they would be.


The centre of the corsage is a button from my craft box & I also used a glue gun and brooch back.
The ribbon on the brooch is Basic black striped Grosgrain ribbon 115615. I used 16" and turned the edges in & stitched them then stitched small running stitches along the length of the ribbon & gently gathered them up to make the rosette & stitched the middle together to secure it. The centre of the corsage is 1/4" Real red grosgrain ribbon 109034 threaded through the buttonholes from front to back & back through the front on opposite sides. I used a glue gun to glue the rosette onto the large button & then the brooch back onto the centre of the button.
I think that these are cute & would make a lovely cracker present.

Tuesday, 7 December 2010

Folded tree tutorial

I am loving this colour way at the moment & really should try harder to try one of the other fabulous combinations, you never know I may find a new favourite.

That was after I had seen the card & cut a circle in half & kept folding it until I was happy with the tree, that tree is on a decorated Christmas cracker at work.

The recipe for this card
Old Olive cardstock 106576
Tiny tags stamps 118091
Tiny tags punch 117190
Scallop trim border 118402
Linen thread 104199
Very Vanilla cardstock 106550
Real red Ink pad 103133
Four the Holidays stamps 116921
Dazzling diamonds 102023
2-way glue pen 100425
Jolly holiday DSP 117159

All of the above product is available from Stampin' Up and can be purchased through me.


Monday, 6 December 2010

Making time to blog surf

I'm having a kinda couch potato day today, I did have plans to clean the house from top to bottom in preparation for the Christmas decorations this coming weekend but I came home from work feeling kinda yucky, not ill but really yuck maybe my bodies way of saying " hey slow down there are still 23 days left until Christmas you don't need to complete everything in the next 48 hours".

So after completing the essential household tasks, today is a couch day & whilst sitting here I have come across some new blogs that weren't in my list. 
The first is Amanda's blog The craft spa where I found the most adorable little Christmas pudding table favours, now I have already made the Christmas day favours so I thought maybe Boxing day for these little beauties. So I hot footed it into my craft room to try making my own Christmas puddings. I am not good without instructions but these were surprisingly easy.


1. Soft suede card 10cm square

2. Scored at 3cm in on all four sides.

3. Cut a line into the creased line, one on each corner to make the flap ( dont cut them off completely )

4. Glue each flap & hold in place with a mini bulldog clip until dry.

This is the little box part of the Christmas pudding holder, ready to decorate.

5. Cut 2  x 13/4" circles from the soft suede, these will be the Christmas puddings.

6. Using a scrap piece of card punch assorted holes using the crop o dile, 1/4" circle, & 1/2" circle randomly but not adjoining.

7. Using the punched piece of card as a stencil take a sponge dauber & Chocolate chip ink pad & dab through the holes  on the two pudding shapes to make them look fruity, this can be repeated using a different colour.

8. From Whisper White card cut 2 scalloped circles & stick to the top of the Christmas puddings to make the dripping icing & trim. The bottom of the puddings will need to be trimmed to a straight edge.

9. Using a Two way glue pen & some Dazzling diamonds i glittered the edge of the icing, this is personal choice I love glitter with everything.

10. The holly berry is punched from real red card stock using 1/2" circle punch, cut one for each pudding.

11. The Holly Leaves are Old olive cards tock cut 4 small ovals from the card & using the small  heart punch using just the very top of the heart nip the pieces off the small oval to shape the Holly leaves.

12. Using real red ink pad stamp the Merry from the tint tags set onto Very vanilla card & punch with the Jewellery tag punch.


13. Assemble the holly at the top of the Christmas pudding & stick a pudding on the front 7 back of the small box.

14. The box is now ready to fill with a Lindor ball or a ferro Rocher chocolate.


The next site that I found is an Origami site which I have seen before but never ever attempted to make anything from, If you know me personally you'll know that I don't do Fiddly & I really struggle with anything that needs to be measured precisely.
But I decided to have a go at the Christmas tree that Alice showed me how to make the other day.


The Tree
The tree is folded from some of the papers from the Simply scrappin kit called Christmas Jingle, I have now made about 10 different projects from that kit & still have a whole load of the papers & stickers left, I cannot believe just how far those kits go.

The card is made up from a Crumb cake base, the matt on the card is whisper white & a piece of the patterned paper from the Scrappin kit again & the eyelet border punch.
The stamped swirls on the card are using the beautiful swirl from the season of Joy set, stamped in Versamark, heat n stick powder & Dazzling diamonds.

The Tree decorations are the spiky flower from the boho blossoms punch with little nicks cut between the petals to get the star effect. 

Tombow glue dotted in the middle & then dipped in Dazzling Diamonds.

The final site that really caught my eye I found by accident in pursuit of the instructions for the folded Christmas tree in the previous card I found Lydia's blog ( well at least I think that's her name ).
From the blog understandtheblue
Check out some of her cool ideas, would you have thought to use printed petals to make thanksgiving turkey his tail feathers? No & neither would I.
On this blog I found another kind of folded tree card so I thought I would give that one a try. Please check out understandtheblue blog for tutorial on this card.
I know the tree is wonky, it moved after I had glued it down, I did weigh it down with a paper punch, which must have moved it before it dried.

What a cute & simple card if you need a card to mass produce, maybe this is the one. The bird is made from the wing of the bird on a branch punch & one of the basic pearls for his eye.


It's day 8 of the snow here in Norwich & despite having to go to work in the snow I am still loving it
Whatever your doing today take care & stay warm.
XX

Saturday, 4 December 2010

Is your tree up yet?


I love this time of year when all of the decoration boxes come out of the loft & it really begins to feel like Christmas, well if your house hasn't yet descended into Christmas Chaos then here is a little tree to keep you going, its all made with Stampin' Up punches.

Supply List

110844 1/4" circle ~ Berries / Decorations
119883 Full heart ~ Tree Branches
117190 Jewelery tag
Old Olive Card
More Mustard Card
Early Espresso Card
Real Red Card
Whisper White card
Frost White shimmer paint


All of the above products are from Stampin' Up & are available to purchase Through me.


Friday, 3 December 2010

Are you getting ready to trim the tree?

Here is my second festive punch art, inspired by trimming the tree, I thought that the punches would make great tree lights.


All of the products used on this project are from Stampin' Up & are available to purchase through me.

Thursday, 2 December 2010

Christmas is Coming ~ Ring That Bell

Ring That bell


Supply List

119859 Wide Oval = More Mustard Bell "dome"

119855 & 119863 Large & Small Oval = More Mustard Bell "opening"  
119861 1-1/4" Square = Strip of Chocolate Chip for bell "clanger"
110844 1/4" Circle = Chocolate Chip for bell "clanger"
119855 Large Oval Punch = Old Olive for Leaves (use 1/2" Circle punch to punch away leaf shape)


110844 
1/4" Circle = Real Red Holly Berries

Reindeer Table favours

I have been experimenting with some different ideas for table favours for the Christmas dinner table, so here is Rudolph ready to hold a small present or a sweet treat.


Supply List
Crumb cake Card stock 121685
Chocolate Chip Card stock 108599
Basic Black Card stock 121688
White gel Pen105021
Basic Black Journaller pen 105394
Bird Punch 117191
1/2" Circle 119869
1/4" Circle 110844
Top Note Die or similar shaped die

The inside of the box is made from a strip of card either matching or co-ordinating. The strip is 10 1/2 " long x 2 1/2" wide, & is scored at 1/2" in on either long side, & again at 3 3/4" & 6 3/4".
Fold along all of the folds & snip into the middle fold lines.

Glue as shown in the picture.


Glue on the back Top note panel


All of the above products are available from myself as an independent Stampin' Up demonstrator.

Wednesday, 1 December 2010

Contempo Christmas is one of the latest set I've bought & I thought that i'd try the clear mounted stamps & I love them, I don't think that they will ever replace my beautiful wood mounted stamps but who knows.

Recipe sheet for this project.
Old Olive cardstock 106576
Jolly holiday DSP 117159
Real red cardstock 106578
Chocolate chip cardstock 108599
Very vanilla Cardstock 106550
Real red ink 103133
Whisper white Grosgrain ribbon 109025
Ornament punch 119847
1 3/4" circle punch 119850
1 3/8" circle punch 119860
Contempo Christmas 120594
Basic pearls 119247
Occasional Greetings 110520

All of the above products are from the Stampin' Up range & are available to purchase through me.

Santa Table favour


Another Favour box for your Christmas table, of course this could be made in alternative colours to coordinate with your colour scheme.


.

Tuesday, 30 November 2010

Keeping it all together

I love stationery & notebooks so the Pukka project file had it all in one place, but as lovely & functional as it was it needed the creative touch.


This project file is the ideal place to keep all of my stampin' Up information.


Project list to make this you will need.
Love letters papers 117162
On board Alphabet soup 119239
Cherry cobbler Ink pad 119669
Early Espresso Ink pad 119670
Vintage vogue set 117690
Crystal effects 101055
Flower accent 117686
Very vanilla cardstock 106550
Hodgepodge Hardware 111325
Versamark ink pad 102283
Clear embossing powder 101428
Heat tool 110197


All of the above product is from Stampin' Up and is available to purchase through me.

Monday, 29 November 2010

Day 6 of the snow

I know that not everyone enjoys the extremes of weather but I love the snow, today is the 6th day in a row that we've had snow so I tool a couple of pictures of the cats to share with you.

This is the first time that Maddie has been out in the snow as last year she was too young to go out.


The sight that greeted us this morning on day 6 of the recent snowfall
Love it or hate it I hope that your all taking care.

Share what we love

I jumped in my car with my bag of stamps, my punches, and my apron on.
Driving to her house where my girlfriends with, to see my new catalog.

Here I am, and it’s time for me to shine.
Grab my bag, and I’m nervous like the first time.

It all seems so crazy!
I was looking for a way to make it.

Now we’re chilling out; having such a good time
Some are here for the very first time.

Making and Taking
Being creative

Blowing everybody’s mind

We share what we love.
We love what we do.
Come on sing it with me.

Doesn’t get much better
Stampin’ Up! together.
We share what we love.
We love what we do.

Ah, life is good.
Yeah, Yeah, Yeah
Sharing it with the world

Yeah, Yeah, Yeah
Sharing it with the world


Bird House table favours

I originally saw these birdhouses earlier in the year when the bird punch was first released by Stampin' Up on Jo's Blog Jo is a very talented fellow demonstrator. I never got round to making the original project but when I popped back to Jo's blog a couple of weeks ago I fell in love with her Christmas version of the little birdhouses & even better Jo has altered the template so you now get two little birdhouses from a single A4 sheet of card. I decided that I would have a try of this project & make them as the favour boxes for my Christmas dinner table.


I've made six of these now ready to be filled, that's why the roof is only stuck down on one side.


The colours for my Birdhouse


Cardstock
Crumb Cake
Chocolate chip
Soft Suede
Real Red
Garden Green
Ink
Whisper White
Early Espresso
Stamps
Vintage Vogue
Serene Snowflakes


I will now have to try & make something equally as beautiful for the table for Boxing day., So watch this space.
Thanks Jo for the inspiration

Sunday, 28 November 2010

And last but not least

The special swaps
Many demo's too part in a Convention memento swap which is basically a mini scrapboo page that has a picture of themselves as a memento from convention.
I didn't opt to take part in this swap as the group ended up being 90 people & I knew that I would struggle to complete just my basic swaps, but I did get given three of these swaps as some people had made extra's to hand out.


Thank you ladies for sharing your Memento swaps with me.

Saturday, 27 November 2010

Convention swaps Day 5


Well as promised here are some of the wonderful swaps I received at convention, this is a very photo intensive page so I suggest you grab a nice cup of tea & some biscuits & enjoy.


I hope your feeling inspired.

Related Posts Widget for Blogs by LinkWithin

Stampin' Techniques

Stampin' Techniques
Two step Stampin

Watercolouring

Masking

Markers

Rock n roll

Stampin' Pastels

Heat embossing

Crafts are here

Crafts are here, crafts are there,

My craft supplies are everywhere.

I really should clean this mess,

but I like it I confess.

Floor is littered, chairs are piled,

Kitchen's looking pretty wild.

On the table, counter too,

Seems that any place will do.

Hall is stacked with cartons high,

filled with things folks like to buy.

Garage is full, but so far....

there's still room to park the car.

I never have an idle day,

New ideas come my way.

Don't know yet what I'll create,

but my imagination's great.

My family smiles, they don't complain,

although at times I am a pain.

but when all is said and done,

I really am a crafty one!

I"ve been visited

link to free hit counter html code
Visit the hit counters gallery.

Guest book

NeoCounter