The final all day event for 2012

Here are the dates for 2012 Experience days that Sharon & myself have organised.

Now Booking

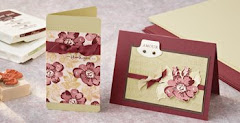
Saturday 1st December at Hethersett Village Hall for the last all day event of 2012 & a Christmas Card & gift event
Theme - A whole day crafting
Cost - £25

Future Dates:


Saturday 1st December ~ Christmas gift event

And don't forget for every event you attend you will receive a FREE raffle ticket which could win you a
BIG SHOT BUNDLE.

(Draw to take place during December's Event)

All DAYS HAVE VERY LIMITED PLACES SO BOOK NOW TO AVOID DISAPPOINTMENT. YOUR PLACE IS ONLY SECURED ONCE PAYMENT IS RECEIVED.


Do you fancy a catalogue party?

Did you know that you can qualify for hostess benefits without having to hold a party?

Just by showing your catalogue around to your family, friends or craft group, If you collect together orders totalling over £150 you will qualify for a free hostess benefits.

If your interested please contact me for further details.

Search This Blog

Contact me

Stampin' Up Contact details I have set these business hours to preserve my home / work life balance.

Email ~ Anytime ~ lovellsinnorfolk@hotmail.co.uk
Or call me between 9.30 Am ~ 8Pm ~ 07092984580


Showing posts with label 3D items. Show all posts

Saturday, 10 March 2012

Sale~A Bration is Happening for just another 21 days

Sharon & I got together on one of our days off this week for A planning / crafting day for our forthcoming event on the 29th April, obviously I cannot share with you the projects that we will be making at the event so I thought I would share a couple of Sale-A-Bration cards I made whilst we were chatting & Sharon was making paper Handbags, yes you did read that right, Paper Handbags. Check out Sharon's Blog post about her latest creations. 

Card Recipe
Cardstock
Whisper White
Ink
Blushing bride
Calypso Coral
Stampin' Write pens 
Stamps
Charming ~ Spring mini 2012
Just perfect Alphabet
Tools
Boho Blossoms Punch
Paper Piercing Tool
Mat PackStamp A Ma Jig
Papers
Everyday Enchantment ~ Sale-a-Bration papers
Embellishments
Stampin' Dimensionals 
Card Recipe
Cardstock
Whisper White
Island Indigo
Ink
Blushing bride
Calypso Coral
Island Indigo
Stampin' Write pens Island Indigo
Stamps
Fresh Vintage stamp set ~ Sale-A-Bration 2012
Elementary Elegance Stamp Set  ~ Sale-A-Bration 2012 
Tools
Decorative label Punch
Stamp A Ma Jig
Sponge daubers
Embellishments
Basic Pearls
Stampin' Dimensionals 
Very Vanilla Seam Binding

The sale-A-bration stamp sets are only available until 31st march 2012

Tuesday, 11 January 2011

Last nights class

I have just looked at today's date & realised that today is 11/1/11, i wonder if that is lucky in any way? I know that my son said it meant something in Binary, but I cant remember what he said.


Last night was the first meeting of the New Year for my stampers 6 group, so what better way to start the new year than with a calender. This is a CD case calender that I saw in an Australian  Scrapbooking magazine just before Christmas.
Project 1
The CD cases are 6 for £1 in the local pound shop
Stamps
Punch Bunch SAB
Cardstock
Pacific Point
Pumpkin Pie
Melon Mambo
Real Red
Pear Pizzaz
Punches
Scallop Trim Border
Two Step Bird Punch
Small heart
Designer Series Papers
Bright Pattern Stack
Accessories
Basic Pearls

Project 2
Stamps
Punch Bunch SAB
Cardstock
Melon Mambo
Early Espresso
Pear Pizazz
Real Red
Punches
Scallop Trim Border
Two Step Bird Punch
Small heart
Designer Series Papers
Bright Pattern Stack


Punch Bunch is a stamp set that you wont want to miss, As you can see by the name it was designed to match the Stampin' Up punches & we have all of the punches except one, the OWL punch.................Watch this space!! The Owl punch will be in the Mini catalogue which is coming in April.

If you would like any information about any of the products featured in this post or any Stampin' Up products or how to get free Sale~A~Bration stamps please contact me at lovellsinnorfolk@hotmail.co.uk 


Thursday, 16 December 2010

A present from my Creative ladies

I have had a couple of beautiful creative presents from my creative Ladies.
The first one is from Kate, but I cannot share that with you at the moment as I know she has made some for other people but after Christmas I will share the cool idea with you.

The second one was from Kate, Alice  & Lucy. They made me a wreath & if you look really closely I am sure that you can work out what it is made from.

Have you worked it out yet?

The wreath is made from a whole tin of Quality street, a Box of Roses & a box of celebrations, all tied around a shaped wire coat hanger.

Thank you ladies everyone who has seen it & raided it thinks it's so lovely. So something else to add to my list of things to make for next Christmas.


Friday, 10 December 2010

Christmas Canvas

A few weeks ago whilst visiting Blog Land I came across a Christmas Canvas which inspired me to try one of my own, unfortunately I cant find the original post, so if you are the original creator I thank you for your Inspiration.

UPDATE ~ Many thanks to Dawn & Sheryl who pointed me back to the original blog that inspired me & an even bigger thank you to Fiona for the original inspiration I do love 3D canvases.
The original idea came from a demo at convention 2009 Jenni pauli


The canvas is 10" square & is pre primed. Then using the En Francais I attempted to stamp the background in Crumb cake ink. This was a lot harder than I had anticipated. But if you try this project don't panic as you can easily re-prime your canvas with white or cream acrylic paints or gesso. Eventually I had a few background images I was fairly happy with, So I set the canvas aside to dry whilst I started to make the buttons.
 I found that it is best to make the buttons in batches. yes I did say make the buttons, they are all made from Stampin' Up Cardstock, Circle punches, Tombow glue & Crystal effects with a sprinkling of Dazzling Diamonds.

1. Punch out 3 circles for each button that you want to make. for this project you will need an assortment of sizes.

2. Punch out ( With space around the punched shape ) a size smaller circle.

3. Holding the original size punch up side down over the smaller hole, centralise the larger punch & punch a hoop.

4. Glue all four Layers together putting the hoop layer on top & leave to dry completely.

5.When dry use the crop o dile to punch the two button holes in the middle of the button. Repeat these steps until you have sufficient buttons for the project, I made more than I needed so I could use the spares on some Christmas cards.

6. On a non stick surface cover the buttons with Crystal effects, making sure not to shake the crystal effects as you don't want any bubbles, If you do get bubbles then use a pin to pop them before the Crystal effects dries.

7. A very light sprinkle of Dazzling diamonds enhances the buttons & then leave to dry completely, I left mine overnight.

8. Lay out the buttons on the canvas in a Christmas tree shape.

9. Thread ribbon or cord through some of the buttons to add texture before finally sticking the buttons in place. Again I used Crystal effects as the adhesive.


My Colours


Cardstock
Real Red
Chocolate Chip
Old Olive
Daffodil Delight

All of the above products with the exception of the canvas are available from the Stampin' Up range & are available to purchase through me as an Independent creative coach.

Monday, 6 December 2010

Making time to blog surf

I'm having a kinda couch potato day today, I did have plans to clean the house from top to bottom in preparation for the Christmas decorations this coming weekend but I came home from work feeling kinda yucky, not ill but really yuck maybe my bodies way of saying " hey slow down there are still 23 days left until Christmas you don't need to complete everything in the next 48 hours".

So after completing the essential household tasks, today is a couch day & whilst sitting here I have come across some new blogs that weren't in my list. 
The first is Amanda's blog The craft spa where I found the most adorable little Christmas pudding table favours, now I have already made the Christmas day favours so I thought maybe Boxing day for these little beauties. So I hot footed it into my craft room to try making my own Christmas puddings. I am not good without instructions but these were surprisingly easy.


1. Soft suede card 10cm square

2. Scored at 3cm in on all four sides.

3. Cut a line into the creased line, one on each corner to make the flap ( dont cut them off completely )

4. Glue each flap & hold in place with a mini bulldog clip until dry.

This is the little box part of the Christmas pudding holder, ready to decorate.

5. Cut 2  x 13/4" circles from the soft suede, these will be the Christmas puddings.

6. Using a scrap piece of card punch assorted holes using the crop o dile, 1/4" circle, & 1/2" circle randomly but not adjoining.

7. Using the punched piece of card as a stencil take a sponge dauber & Chocolate chip ink pad & dab through the holes  on the two pudding shapes to make them look fruity, this can be repeated using a different colour.

8. From Whisper White card cut 2 scalloped circles & stick to the top of the Christmas puddings to make the dripping icing & trim. The bottom of the puddings will need to be trimmed to a straight edge.

9. Using a Two way glue pen & some Dazzling diamonds i glittered the edge of the icing, this is personal choice I love glitter with everything.

10. The holly berry is punched from real red card stock using 1/2" circle punch, cut one for each pudding.

11. The Holly Leaves are Old olive cards tock cut 4 small ovals from the card & using the small  heart punch using just the very top of the heart nip the pieces off the small oval to shape the Holly leaves.

12. Using real red ink pad stamp the Merry from the tint tags set onto Very vanilla card & punch with the Jewellery tag punch.


13. Assemble the holly at the top of the Christmas pudding & stick a pudding on the front 7 back of the small box.

14. The box is now ready to fill with a Lindor ball or a ferro Rocher chocolate.


The next site that I found is an Origami site which I have seen before but never ever attempted to make anything from, If you know me personally you'll know that I don't do Fiddly & I really struggle with anything that needs to be measured precisely.
But I decided to have a go at the Christmas tree that Alice showed me how to make the other day.


The Tree
The tree is folded from some of the papers from the Simply scrappin kit called Christmas Jingle, I have now made about 10 different projects from that kit & still have a whole load of the papers & stickers left, I cannot believe just how far those kits go.

The card is made up from a Crumb cake base, the matt on the card is whisper white & a piece of the patterned paper from the Scrappin kit again & the eyelet border punch.
The stamped swirls on the card are using the beautiful swirl from the season of Joy set, stamped in Versamark, heat n stick powder & Dazzling diamonds.

The Tree decorations are the spiky flower from the boho blossoms punch with little nicks cut between the petals to get the star effect. 

Tombow glue dotted in the middle & then dipped in Dazzling Diamonds.

The final site that really caught my eye I found by accident in pursuit of the instructions for the folded Christmas tree in the previous card I found Lydia's blog ( well at least I think that's her name ).
From the blog understandtheblue
Check out some of her cool ideas, would you have thought to use printed petals to make thanksgiving turkey his tail feathers? No & neither would I.
On this blog I found another kind of folded tree card so I thought I would give that one a try. Please check out understandtheblue blog for tutorial on this card.
I know the tree is wonky, it moved after I had glued it down, I did weigh it down with a paper punch, which must have moved it before it dried.

What a cute & simple card if you need a card to mass produce, maybe this is the one. The bird is made from the wing of the bird on a branch punch & one of the basic pearls for his eye.


It's day 8 of the snow here in Norwich & despite having to go to work in the snow I am still loving it
Whatever your doing today take care & stay warm.
XX

Wednesday, 1 December 2010

Santa Table favour


Another Favour box for your Christmas table, of course this could be made in alternative colours to coordinate with your colour scheme.


.

Tuesday, 30 November 2010

Keeping it all together

I love stationery & notebooks so the Pukka project file had it all in one place, but as lovely & functional as it was it needed the creative touch.


This project file is the ideal place to keep all of my stampin' Up information.


Project list to make this you will need.
Love letters papers 117162
On board Alphabet soup 119239
Cherry cobbler Ink pad 119669
Early Espresso Ink pad 119670
Vintage vogue set 117690
Crystal effects 101055
Flower accent 117686
Very vanilla cardstock 106550
Hodgepodge Hardware 111325
Versamark ink pad 102283
Clear embossing powder 101428
Heat tool 110197


All of the above product is from Stampin' Up and is available to purchase through me.

Saturday, 20 November 2010

Ribbon Tree

After making my paper strip Christmas tree I thought I would tree & make a ribbon tree like the one I saw here in blogland 12 months ago, incidently that is when I bought the polystyrene cones to make the tree's.


This tree was a little simpler to make.
1. Paint the cone with either brown or green paint & set aside to dry, by doing this is the strips of ribbon dont completely overlap you don't see the white cone.
2 Cut your strips of ribbon into 4" lengths, I did mine in a random organised pattern but you can just mix them up . The tree that inspired me was made from all oddments and looked amazing & jewel like.
3. Starting at the bottom about an 1 1/2" up from the edge start pinning the ribbon pieces with both edges together.
4. After completing each row, start the next row slightly offset.
5. Carry on until you get to the top.
6. Using a matching cardstock cut 1 1/4" circle using a punch. Cut a slit to the middle & make a wide cone, like a mandarin hat, glue together using a wet glue like tombow, I use a mini bulldog clip to hold glued items together.
7. When the little cap is thoroughly dry I glued it over the top of the cone before gluing on my droopy bow to finish the top of the tree. I have used a cool melt glue gun for this.

The Pot
The decorated pot is made from a small terracotta plant pot.
1. I painted the pot with antique cream acrylic paint, it did take 2 coats for an even coverage.
2. I then stamped the snowflakes in Real red ink onto white tissue paper & set aside for a few moments to dry.
3. When the stamped images are dry, I highlighted areas with the Platinum frost paint using a blender pen & again set aside to dry & trimmed closely.
4. Using the decopatch glue I coated the area of the pot I wanted to place the snowflake on. Place snowflake on the glued area. & coat with decopatch glue & smooth flat with the glue brush, repeating until the pot is decorated & completely covered in glue.


Assembly
To assemble the tree I painted a pencil with acrylic paint & carefully pushed it into the polystyrene of the tree.
Inside the pot I put some oasis into the pot & put the pencil into the oasis, Once it was assembled & I was happy it was straight I added a spot of glue to keep it stable.


Thursday, 18 November 2010

Table top Christmas tree

I am busy putting the final touches to my two Christmas events. I have two special evenings planned for my stampers 10 & stampers 6 groups. The dates for these are Monday 6th December or Thursday 9th December at 7pm.
Whilst searching for inspiration I came across these table top tree's, so I decided to have a go.

The base of this tree is a 9cm polystyrene cone that cost just 90p from an Art & craft supplier.
You need approximately 2 sheets of designer series paper measuring 6" x 12" For the eagle eyed amongst you, yes these are last years Christmas papers, I just haven't taken delivery yet of this years Christmas papers, any day now they will be here so watch out for more Christmas projects.
The strips of paper are 1.5cm wide x 4cm long.
Top tip Wear a thimble or thumb guard as I now have a very sore thumb. 
I painted the cone with a brown paint to look like the tree trunk before starting, so if there are any gaps, the white polystyrene wont show through, I used a decorating paint sample with a sponge applicator, very quick & not very messy.
I used two patterns that were double sided, so a total of four designs, I followed a pattern as i'm not very good at random! 
Fold each piece of paper ( NOT creasing ) using a snail on the tip of each strip join together, I found it easier to make all of these little pieces first.
Using sequin pins ( They are shorter ) starting at the bottom pin the first row in place, then start on the second row putting it slightly offset. Carry on until the very top. 
The top isn't the tidiest so I made a floppy bow.

The next tree I am going to make I will make with Ribbon pieces.

If you decide to make a tree, please send me a link to the pictures.


Sunday, 12 September 2010

From Pukka pad to beautiful designer notebook

When I finished work yesterday I had to go with Abi  buy yet more stationery for school & being a paper crafter I am a sucker for stationery, I think I always have been as a little girl I loved being surrounded by paper & pencils & glue & scissors. I remember opening my Christmas stocking one year & finding a glue pen, but Father Christmas forgot to put any paper in my stocking, so I used the glue pen on all the pages of a comic magazine, my Mum was so cross.

From this
Well back to the story I came home in such a bad mood I decided to go straight up too my craft room until I calmed down, & decided to give my Pukka pad a makeover. If you are careful you can take the covers off the pad.
Using Bashful blue cardstock, Creamy caramel ink pad on the en francais background stamp all over the from cover. Then using Chocolate chip ink I stamped the Baroque Motifs swirl in two corners. Then with Pink Pixie I stamped the single flowers randomly around the swirl. On a spare piece of card I stamped the flowers again & punched them out with the Boho blossoms punch & popped them up with glue dots.
The A5 covers were held against the original covers & carefully lined up the holes on the Crop o dile, carefully I reconstructed the pad with its new covers & using the Bind it all I clamped the spiral spin back together, this can however be done by hand.
The ribbons tied around the spine Are bashful blue Striped Grosgrain & Taffeta ribbon on Bashful blue.

Sadly both of the ribbons are retiring, but one the happy side they are making way for lovely new stash.

Sunday, 8 August 2010

My head is banging & creativity is in short supply

My head is absolutely banging again today, I wish the Dr's could find a reason why I have so many headaches as in the last 14 days I have had bad headaches / migraines on 11 of them & today is no exception. As much as i would love to pop upstairs & create something I cannot seem to concentrate at the moment so I have been surfing the net for some tutorials & inspiration. So I thought i would share the links that i've found & showcase some of my favourite blogs.
The first site is Crescent stampin & the talented Carol, here is the fabby Christmas box that she's recently made & a link to her tutorial.

http://crescentstampin.blogspot.com/2010/08/free-christmas-gift-box-tutorial.html


Onto Mary at Stampin' Pretty a fellow SU Demo from over the pond & the wonderful idea of designer series paper envelopes.
http://www.stampinpretty.com/2010/07/elegant-soiree-trio.html
Check out mary's other tutorials whilst visiting her blog as she has been doing a feature called envelope envy, which takes the boring envelope to a whole new level.
http://andreawalford.com/?page_id=646


The next tutorial laden blog comes with a very serious health warning," you will spend hours here" dont just make a cup of tea, make a whole flask & settle down for a good look around this blog. Andrea at Sunny Stampin' inc has the most amazing tutorials or every thing I have chosen to showase just 1 of her amazing tutorials & projects & her blog is so easy to navigate.
Andreas tutorial Archive


Carlas Scraps Just to many to choose from here & some great colouring tutorials.


Stamp with Tammi Another very talented lady from over the pond, great videos tutorials
http://www.stampwithwendy.com.au/2010/07/create-a-card-friday-birthday-card-for-kids.html


Stamp with wendy many amazing ideas from a fellow SU demonstrator this time in Australia


http://clairedaly.typepad.com/sisterhood_of_the_travell/past-tutorials-to-downloa.html


Art with heart is a new blog for me, but WOW she has an amazing array of tutorials to share


http://sarahsinkspot.com/blog/2010/02/paper-gift-bows.html
Sarah has great tutorials for many very diverse Stampin' Up projects here is just one for this amazing paper bow. This link will take you to Sarah's Tutorial Library which not only has project tutorials but also technique tutorials.

One final listing for today the top 50 Stampin' Up blogs in Australia 
All of the images in this post are the intellectual property of the blog owners & are featured here for inspiration only please contact the owners for any further information. 
Hopefully the new tablets will start to kick in soon & I can resume my own creativity but I hope that you enjoy your tour round some of my fav fellow demo's blogs.


Saturday, 7 August 2010

All of a flutter

I am always on the hunt for new ideas to extend the use of my current stamp sets & I found a beautiful picture online using the same format but with rows of coloured hearts. So I adapted it using the All of a flutter butterfly stamp. 
The images are stamped using the Basic Grey ink pad, Coloured using the Stamp n write pens & blender pens, the image has a lovely shimmer that was achieved by using the frost white shimmer paint, the backing card is Chocolate chip, I just dip the blender pen in the lid of the paint & hi-light areas on the stamped image. I keep all of my pringle tin lids as they make great disposable palettes


Tuesday, 3 August 2010

What Stamps fit in each punch?

Ever been tempted with a stamp set & want the corresponding Stampin' Up punch? and not sure which one it is, this can be used before you buy the stamp set over the image in the catalogue, did you know the images in the catalogue are actual size?
Ever been in the middle of a project & need to quickly find the correct circle punch to punch out a greeting?

Well I came up with an easy solution & they also make a really col bookmark in your idea book & catalogue.

Monday, 26 July 2010

Card with detachable bookmark

Well I did day that I had found a 3rd style of bookmark. Well this style is called a detachable bookmark card & again I found it from a tutorial on splitcoast stampershere is the tutorial. I only used the tutorial as a starting point and adapted the card. To make the perforations I used the perforating blade of The Stampin' Up Cutter kit.

Front of the card 
The perforated bookmark is on the right of the picture 
Cardstock
Rich razzleberry
Whisper white
Basic black
Inks
Rich Razzleberry
Old olive
Melon mambo
Soft suede 
Ribbon & Accesories
Jumbo eyelets
Rich razzleberry polka dot
Tools
Cutter kit
Stamp a ma jig
Crop-A-Dile

All of the above products are from Stampin' Up & are available to purchase through me as a Creative coach for Stampin' Up

Related Posts Widget for Blogs by LinkWithin

Stampin' Techniques

Stampin' Techniques
Two step Stampin

Watercolouring

Masking

Markers

Rock n roll

Stampin' Pastels

Heat embossing

Crafts are here

Crafts are here, crafts are there,

My craft supplies are everywhere.

I really should clean this mess,

but I like it I confess.

Floor is littered, chairs are piled,

Kitchen's looking pretty wild.

On the table, counter too,

Seems that any place will do.

Hall is stacked with cartons high,

filled with things folks like to buy.

Garage is full, but so far....

there's still room to park the car.

I never have an idle day,

New ideas come my way.

Don't know yet what I'll create,

but my imagination's great.

My family smiles, they don't complain,

although at times I am a pain.

but when all is said and done,

I really am a crafty one!

I"ve been visited

link to free hit counter html code
Visit the hit counters gallery.

Guest book

NeoCounter