The final all day event for 2012

Here are the dates for 2012 Experience days that Sharon & myself have organised.

Now Booking

Saturday 1st December at Hethersett Village Hall for the last all day event of 2012 & a Christmas Card & gift event
Theme - A whole day crafting
Cost - £25

Future Dates:


Saturday 1st December ~ Christmas gift event

And don't forget for every event you attend you will receive a FREE raffle ticket which could win you a
BIG SHOT BUNDLE.

(Draw to take place during December's Event)

All DAYS HAVE VERY LIMITED PLACES SO BOOK NOW TO AVOID DISAPPOINTMENT. YOUR PLACE IS ONLY SECURED ONCE PAYMENT IS RECEIVED.


Do you fancy a catalogue party?

Did you know that you can qualify for hostess benefits without having to hold a party?

Just by showing your catalogue around to your family, friends or craft group, If you collect together orders totalling over £150 you will qualify for a free hostess benefits.

If your interested please contact me for further details.

Search This Blog

Contact me

Stampin' Up Contact details I have set these business hours to preserve my home / work life balance.

Email ~ Anytime ~ lovellsinnorfolk@hotmail.co.uk
Or call me between 9.30 Am ~ 8Pm ~ 07092984580


Wednesday, 21 March 2012

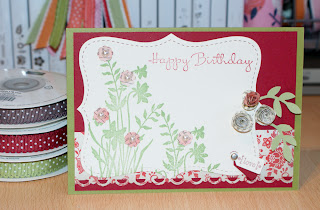
Keeping it Fresh

I have been using the same papers for a few weeks now, so I have become very conscious of keeping my daily projects fresh & trying not to get caught in a colour trap, something we are all guilty of, if you look back at my blog in the couple of months before Christmas over the last couple of years and I am definitely guilty of having favourite colour combinations.

Card Recipe
Cardstock
Whisper White
Cherry Cobbler
Old Olive
Ink
Wild Wasabi
Calypso Coral
Stampin' Write pens 
Stamps
Just Believe
Happiest Birthday Wishes ~ Hostess
Tiny Tags stamp set
Tools
Itty Bitty Shapes Punch pack
Paper Piercing Tool
Mat Pack
Stamp A Ma Jig
Jewelry Tag Punch
Bird Builder Punch
Scallop Trim Border
Papers
Everyday Enchantment ~ Sale-a-Bration papers
First Edition Speciality papers
Embellishments
Stampin' Dimensionals 
Basic Pearls
Silver mini Brads


Tuesday, 20 March 2012

Everyday Enchantment Free papers

If you were to ask me a couple of months ago when I placed My pre-order for sale-A-Bration which was my favourite product I'm sure that I would have said one of the stamp sets, that was then. If you asked me know I know categorically I would choose the Everyday Enchantment papers that you can qualify to get free with a spend of £45 during Sale-a-Bration.
I love the co-ordinating colour family of
Lucky Limeade
Pool Party
Peach Parfait
Calypso Coral
Poppy Parade
Very Vanilla
Soft Suede
I know that I'll be using this colour palette long after Sale-A-Bration is finished.


Card Recipe
Cardstock
Whisper White
Lucky Limeade
Pool Party
Calypso Coral
Ink
Stampin' Write pens Lucky Limeade, Calypso Coral & Poppy Parade
Stamps
Fresh Vintage S-A-B
Happiest birthday Wishes
Tools
Bird Builder Punch
Scallop Trim Corner punch
Scallop Trim Border Punch
Stamp A Ma Jig
Perfect polka Dots Embossing Folder
Sizzix Big Shot
Papers
Everyday Enchantment ~ Sale-a-Bration papers
Embellishments
Stampin' Dimensionals 
basic pearls


Monday, 19 March 2012

Recycling

Since October last year when the new catalogue was released I have run many classes and events, each event a prepare a card pack for each attendee. Whilst tidying up on Saturday Morning I was staggered to find I had 37 such packs that I'd made up for workshop projects that hadn't been used for various reasons, Cancellations, Illness, or even when I had prepared 3 cards for a class that we had so much fun chatting that we only completed two.
I hate waste so one of my tasks over the next 4 weeks is to try and use up all of the remaining 35 card packs.
I made two cards on Saturday morning, some of the papers are no longer available so I wont write a recipe for these two cards but if you would like any further information lease feel free to contact me. The cards are shared just for inspiration.


Happy Crafting, Until next time.

Sunday, 18 March 2012

Mothers Day

So far i'm doing well with one of my 101 things to do in 1001 day's. These are personal challenges, projects I want to try and small tasks that I want to accomplish over the next two & a half years in my personal, professional & social life.
One of the items was to make all of the celebration cards in the month preceding the event, so far I have managed to keep on track, I know that it is only March & I only started the project on the 1st January 2012, I also know that said list is still a work in progress.


So I thought I would share with you one of the "on track cards" my Mothers day card that was posted early as I wasn't running around like the proverbial headless Chicken.

 This is a similar style to the Love card I made last week using the lovely papers from the Sale-a-Bration called Everyday Enchantment.
And close up 

Card Recipe
Cardstock
Whisper White
Calypso Coral
Poppy Parade
Ink
Blushing bride
Calypso Coral
Stampin' Write pens 
Stamps
Just perfect Alphabet
Tools
Boho Blossoms Punch
Paper Piercing Tool
Mat Pack
Stamp A Ma Jig
Beautiful Wings Embosslit Die
Sizzix Big Shot
Itty Bitty Shapes Punch pack
Scallop Trim Corner Punch
Papers
Everyday Enchantment ~ Sale-a-Bration papers
Embellishments
Stampin' Dimensionals 
Basic pearls


I hope that you've had a lovely Mothers day whatever you were doing & a big Thank you for my cards & gifts.

A friendship cake called Herman‏


Herman is getting everywhere. Has the friendship cake revival come knocking on your kitchen door?

Herman the friendship cake

For anyone not yet initiated into the ritual of Herman cake creation, it is the culinary equivalent of a chain letter. Someone presents you with a jar of yeasty mix and a set of instructions on when to add sugar, flour and sift or stir it. Ten days on, you divide the mixture into five, pass four jars onto friends and, with the rest, bake yourself a very yeasty and sugary but surprisingly tasty cake.

My introduction was through a conversation with a friend, until that time I was unaware of the friendship cake I now know as Herman. With a little help from google I managed to find some instructions.

The instructions that came with "him" tell me this is because "he" needs more space. Already Herman is no longer just a pot of yeast. He's a living, breathing part of the family, when you receive your very first Herman he must be moved to a more spacious home – that's a bowl to you and me. And, he must be stirred and engaged in rather one-sided conversation over the next few days until he's ready for his first meal (milk, flour and sugar) on Day Four.

He's quite an undemanding, if slightly yeasty smelling, charge. Four days of stirring and chatting later, he wants the same meal again, before being divided and potted, ready to spread a little happiness to several other families. Finally, you add more flour and sugar, eggs, cinnamon and apples and stick him in the oven. But I'm not sentimental and Herman lives on, through his four babies, 

The name Herman is taken from the Amish sweet, cinnamon-flavoured bread and the cakes have their origins in the sourdough products made by the early American pioneers. Airborne yeast was used to ferment a mixture of flour sugar and water, and then used to make pancakes, bread and cakes. What was left of original starter leavening mixture was then passed around the community for others to cook with.

These days Herman cakes are a luxury gimmick rather than a necessity and in this form they have been around for several decades. My mother remembers making and passing on Hermans before the war. I missed out on them when I was at school, though I was busy giving making ginger beer plants which are essentially the same process and sharing them around the neighbourhood.


The current Herman revival is gathering momentum with the help of internet chat forums and comes at a time when we are being encouraged to waste less and share more.

In essence, Herman cakes are a quirky fun way of doing something we're out of the habit of doing - sharing surpass food within the community rather than putting stuff in giant freezers or throwing it away. 

"There is no sell by date," which is part of the appeal. In these times of almost impenetrable packaging and obsessive food hygiene there's added pleasure to be had from eating something that has been through many hands and possibly several generations, and survived to continue the tale.

Herman friendship cake

Herman (or Hermann) is a friendship cake.  You can’t buy him, but you can be given a gift of him…then you can give him away. He’s chock full of yeast so over 10 days he’ll grow slowly but surely…and then you can eat him!

He doesn’t need any swanky fridge style accommodation…the kitchen work surface will do.  He doesn’t even need a lid…just a tea towel.  Your granny’s tea towel will do – it doesn’t even have to be new.  Just cover him and he’ll merrily grow at room temperature.

To spread a little friendship far and wide, just follow the instructions below and in 10 days you will have a Herman cake to eat and four mini Hermans to give to friends and bring a little Herman shaped smile to their faces.


That said, if you want to have your cake and eat it right now, go straight to day ten and don't tell your friends!  But we know you'll share.

If you wish to start a friendship chain from scratch follow the instructions below counting the day you begin as day zero.

Herman cake sour dough starter

2 cups flour
2 cups milk
1 cup sugar
1/3 cup warm water
2 tbsp or 2 packets active dry yeast
Today is day 0. Record the date/day on calendar.

Sprinkle 1 tbsp of the sugar over the warm water. Sprinkle yeast over this and leave in a warm place for around 10 minutes so it doubles in size.

Mix the milk, remaining sugar, flour and yeast mixture in a large plastic or glass container and stir using only a wooden spoon.

Cover loosely or place plate over top of container so Herman can breathe and leave in a warm place.

The next day is Day 1 and you now proceed with the following instructions as if you’d been given a friendship cake mixture to grow. Try to stir at least once each day.

Instructions for the Herman cake

If you would like to spread a little friendship follow the instructions below and at end of 10 days you will have a cake to eat and four starter kits to pass on.

If you cannot wait to have your cake and eat it, go straight to day 10 but you will forego the opportunity to pass on the cake to friends.


Day 1: Today Herman is given to you. Put him in a big bowl (at least 4pt capacity). Cover Herman loosely so he can breathe - a tea towel or loose lid is ideal.

Days 2 & 3: Stir Herman 2-3 times a day with a wooden spoon  (be lazy – stick to wooden so you can just leave it in the bowl without troublesome corrosion issues)

Day 4: Herman is hungry. Give him the following:

200mls milk
200g self-raising flour
250g sugar
Days 5, 6, 7 & 8: Stir Herman 2-3 times a day.

Day 9: Herman is hungry again. Give him the same ingredients you gave him on Day 4. Stir well then divide him into 5 equal parts. Give 4 baby Hermans away to friends or family with a copy of these instructions. Keep the 5th portion to bake, it's yours for the eating.

Day 10: Herman is absolutely starving. He needs a holiday. He likes to go to a hot resort. The oven is his favourite. Pre-heat oven to 170ºC (150ºC fan-assisted oven) and grease a cake tin generously. Prepare him for his holiday using one of the following:

150g self-raising flour
100g finely chopped nuts/raisins/mixed fruit
100 mls oil
Half a teaspoon of baking powder to help him rise.
2 teaspoons cinnamon for extra spice.
3 eggs
2 grated apples to keep things moist
Mix everything together and pour into a very well greased loaf tin or 9” x 9“ cake tin. Bake for 1-1 ½ hours, depending on your tin. Cool in tin for 10 mins then turn out.

Right i'm Now off to the kitchen to give life to my first Herman offspring


Herman Variations

Ginger Herman:

Here is recipe for ginger Herman. It was a rather sloppy mix but have to say its the lightest cake yet.

Ginger Cake : 150g self-raising flour, 1½ tsp ground ginger, ½ tsp cinnamon, ½ tsp bicarbonate soda, pinch of salt, 125g golden syrup, 60g finely chopped stem ginger, 1 tbsp ginger syrup from stem ginger jar, 2 heaped tbsp sultanas, 75g dark muscavado suger, 2 eggs, 150 ml milk, 75 ml butter at room temp/softened in microwave.


Apple & Choc Chip:

I thought I would give you some feedback on my version of the Hermann with the apple and choc chips. The taste is actually very good and the blend of cinnamon, apple and chocolate works well. I do however intend to make it again with a slightly amended mix. The centre and base of the cake ended up to ‘wet’ and the whole thing was a little too sweet. I will probably reduce the amount of apple and choc chips to stop the mix dropping to the base and also maybe reduce the olive oil. Regarding the sweetness I think I will reduce the sugar in the last part of the mix – that should help. 

Chocolate & Honeycomb:

Mine was divine. I didn’t use any of the ingredients on the list, just the basic ones like sugar, oil, etc. Then, instead of apples and cinnamon I added chocolate and honeycomb… Wow, it was lush!!!!  

A nice idea at Christmas:

Baking mine tomorrow, going to make the starter mix 10 days before Xmas and hand them out for Xmas pressies, as well as bake mine on Boxing Day. 


Christmas Herman – A festive variation of this popular cake:

Try glace cherries, stem ginger in syrup, a small amount of mixed peel, sultana’s and some mixed spice. Sprinkle the top with sugar and bake. When cooked spike with some brandy then decorate with marzipan and dust with icing sugar. 


Saturday, 17 March 2012

Using Stampin' Up! Dies with the Cuttlebug‏


I know that many of my customers and blog readers love the Stampin' Up dies but already own a die cutting machine, whilst i'm sure many of you expect me to try and sell you the Sizzix big shot, those of you that really know me will know that's not my way. I own both machines and each machine basically does exactly the same job, so why buy another machine when you could be spending your hard earned pennies on the beautiful exclusive dies from Stampin' Up.

I came across this fabulous mini tutorial On splitcoaststampers, I cannot now find the original poster, so if you know or its you firstly thank you & please leave me a message to credit your post.

Bigz XL Dies (for example, Matchbox or Fancy Favor, 6" x 13 3/4" x 5/8" thick)
Note: The Extended Cutting Pads and Premium Crease Pad sold as accessories with the Big Shot are too wide for the Cuttlebug.
Sandwich (from the bottom) Cuttlebug B Plate
Bigz XL Die face up
Card Stock or Designer Series Paper Cuttlebug B Plate
TIP: I find it helpful to move the two acrylic "B" plates slightly forward of the die (maybe an inch or so) so that they hit the opening first. The sandwich seems to grab better. Since these plates are shorter than the Extended Cutting Pads, you can't cut the entire length of the die. However, they work perfectly well in sections. The exception would be if the die (for example the Bag With Scallops) is longer than the cutting pads.

Bigz L Dies (for example, Scallop Envelope, Top Note, Pillow Box, 5.5" x 6" x 5/8" thick, from the bottom)
Cuttlebug B Plate
Bigz Die Face Up
Card stock or Designer Series Paper Cuttlebug B Plate

Textured Impressions Embossing folders
Use the Stampin’ Up! folders exactly the same way that you would use them in the Big Shot.
Sizzlits dies
Cuttlebug A plate
Cuttlebug B plate
Cardstock
die cutting edge facing down Cuttlebug C plate
as an alternative
Cuttlebug A plate - Cuttlebug C plate - cardstock - die cutting edge facing up - Cuttlebug B plate


Monday, 12 March 2012

Welcome veronica

Welcome veronica
I have a new member of my team & her starter kit from Stampin' Up arrived today & she says that it was just like Christmas when she started to unwrap her box of goodies. You can check out veronica's blog and see what she has been making with her new goodies. 


Do you like Stampin' Up products? have you been thinking about Joining Stampin' Up for a while?
Well have a read below to see the excellent current joining offer where you can get up to £320 of starter kit for just £119 until 31st march 2012


Join my team & together we will teach the world to stamp  
Many exciting changes are happening within Stampin' Up over the next few months with the colour renovation so now is an excellent time to join ~ find out why ?

Are you interested in joining the Stampin' Up! family and becoming part of my team? Now with the new catalogue it's an excellent time to join Stampin' Up
Do you love the SU products?

Then why not become an Independent Stampin' Up! Demonstrator and share the journey with me!!!

I currently have an additional special offer on top of the package from Stampin' Up Join my team & I will give you a free Stamp set to the value of £25 or punches to the value of £25.
Join my team during Sale-A-Bration & stampin' Up will give you and additional FREE stamp set of any Value
You don't have to do workshops, you can merely join to satisfy your cravings and enjoy products for a discounted price.

The Starter Kit now costs just £119 which is £30 cheaperthan last year and contains £250 worth of products to get you started with your Stampin Up business there is an additional add on kit called Stampin' memories for an additional £60 valued at £95.

Please mail me on lovellsinnorfolk@hotmail.co.uk for more details
Remember that with the new catalogue just out now is an excellent time to join the Stampin' Up family.

Email Me for all the Details.Ask me about the Benefits of Becoming a Demonstrator yourself & How you can earn A FREE Stamp Set for Joining My Team.....
If you have been thinking of ways to save yourself some money or make yourself some money, why not become part of my Stampin' up team

love being a Stampin' Up! Demonstrator and there are all sorts of Demos making their Stampin' Up! businesses suit their lives, needs and wants. 

Have a look below to find out what kind of Demonstrator you could be...

What kind of Demonstrator will you be?

Whether you want to purchase your own stamping supplies at a discount, earn some extra money from your hobby, or to build a business, Stampin' Up! provides you with the opportunity to reach your goals.

DISCOUNT DEMONSTRATOR:

You like the idea of buying stamps and supplies for your personal use at a 20% discount and occasionally selling to neighbours, relatives, friends etc.

SEASONAL DEMONSTRATOR:

You work hard for a short period of time or season to earn a specific amount of money or to achieve a specific goal, and then you maintain minimum orders and sales during the rest of the year.

HOBBY DEMONSTRATOR:

You love doing workshops and earning extra money when it is convenient. You work alot some months and very little other months. You will do workshops if they are easy to book, and maybe have a regular group that meets together once a month. You enjoy the rewards that being a Stampin' Up! Demonstrator brings, but you don't plan to make Stampin' Up! a career.

CAREER DEMONSTRATOR:

You view Stampin' Up! as a viable business with long-term career potential. You pursue a management role, and you want to continue moving up with your Stampin' Up! career. You love attending Stampin' Up! events and have close relationships with other demonstrators. You work at your business in a consistent and outgoing manner.


As you can see, this is a fun, flexible business you can build to suit your individual needs and goals.
Contact me at lovellsinnorfolk@hotmail.co.uk


Saturday, 10 March 2012

Sale~A Bration is Happening for just another 21 days

Sharon & I got together on one of our days off this week for A planning / crafting day for our forthcoming event on the 29th April, obviously I cannot share with you the projects that we will be making at the event so I thought I would share a couple of Sale-A-Bration cards I made whilst we were chatting & Sharon was making paper Handbags, yes you did read that right, Paper Handbags. Check out Sharon's Blog post about her latest creations. 

Card Recipe
Cardstock
Whisper White
Ink
Blushing bride
Calypso Coral
Stampin' Write pens 
Stamps
Charming ~ Spring mini 2012
Just perfect Alphabet
Tools
Boho Blossoms Punch
Paper Piercing Tool
Mat PackStamp A Ma Jig
Papers
Everyday Enchantment ~ Sale-a-Bration papers
Embellishments
Stampin' Dimensionals 
Card Recipe
Cardstock
Whisper White
Island Indigo
Ink
Blushing bride
Calypso Coral
Island Indigo
Stampin' Write pens Island Indigo
Stamps
Fresh Vintage stamp set ~ Sale-A-Bration 2012
Elementary Elegance Stamp Set  ~ Sale-A-Bration 2012 
Tools
Decorative label Punch
Stamp A Ma Jig
Sponge daubers
Embellishments
Basic Pearls
Stampin' Dimensionals 
Very Vanilla Seam Binding

The sale-A-bration stamp sets are only available until 31st march 2012

Friday, 9 March 2012

Just Charming


Not Just Charming, a trio of Charming to be exact.
Charming is one of my favourite sets from the Spring Mini Catalogue The wood mounted version is Just £17.95 whilst the clear mounted version is £13.95 for that price you get 7 stamps.
I have had this set on my desk for the last couple of weeks as its one of the main sets that we will be using at our next all day Stampin' Extravaganza on 29th April. These cards will not feature in that day, those cards will not be blogged until after the event so if you would like to join us for the all day event please contact either myself or Sharon march.
Card Recipe
Cardstock
Whisper White
Island Indigo
Calypso Coral
Ink
Lucky Limeade
Calypso Coral
Island Indigo
Sahara sand
Stampin' Write pens Lucky Limeade, Calypso Coral, island Indigo
Stamps
Charming ~ Spring mini 2012
Tools
1 3/8" Circle punch
Scallop Circle punch
Scallop trim Border Punch
Square lattice embossing folder
Big Shot Die cutting machine
Stamp A Ma Jig
Embellishments
Whisper White Organza ribbon
Stampin' Dimensionals
Card Recipe
Cardstock
Whisper White
Island Indigo
Lucky Limeade
Ink
Lucky Limeade
Calypso Coral
Island Indigo
Stampin' Write pens Lucky Limeade, Calypso Coral, island Indigo
Stamps
Charming ~ Spring mini 2012
Tools
1 3/8" Circle punch
Scallop trim Border Punch
Square lattice embossing folder
Big Shot Die cutting machine
Stamp A Ma Jig
Embellishments
This card uses the Embedded technique If you look closely you will see that all of the embellishments were added with Tombow to the Calypso Coral panel and then embossed using the Square Lattice Embossing Folder before being mounted on the card base.

Card Recipe
Cardstock
Whisper White
Island Indigo
Calypso Coral
Ink
Lucky Limeade
Calypso Coral
Island Indigo
Stamps
Charming ~ Spring mini 2012
Tools
1 3/8" Circle punch
Scallop Circle punch
Square lattice embossing folder
Big Shot Die cutting machine
Stamp A Ma Jig
Embellishments
Basic Pearls
Stampin' Dimensionals

All of the stamp sets from this project are from the 2012 Spring Mini catalogue are are available to order through me until the 30th April, after that they MAY feature in the main catalogue, at this point I dont know for sure.
If you would like to place an order or have further details about becoming a demonstrator for Stampin' Up please pink me an e-mail at Lovellsinnorfolk@hotmail.co.uk


Related Posts Widget for Blogs by LinkWithin

Stampin' Techniques

Stampin' Techniques
Two step Stampin

Watercolouring

Masking

Markers

Rock n roll

Stampin' Pastels

Heat embossing

Crafts are here

Crafts are here, crafts are there,

My craft supplies are everywhere.

I really should clean this mess,

but I like it I confess.

Floor is littered, chairs are piled,

Kitchen's looking pretty wild.

On the table, counter too,

Seems that any place will do.

Hall is stacked with cartons high,

filled with things folks like to buy.

Garage is full, but so far....

there's still room to park the car.

I never have an idle day,

New ideas come my way.

Don't know yet what I'll create,

but my imagination's great.

My family smiles, they don't complain,

although at times I am a pain.

but when all is said and done,

I really am a crafty one!

I"ve been visited

link to free hit counter html code
Visit the hit counters gallery.

Guest book

NeoCounter