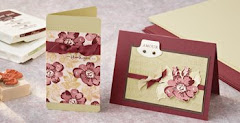
It's hard to believe that ordinary household bleach applied to plain card can produce such a wonderful rainbow of colours. Not all card bleaches to reveal layers of unexpected hues depending on how much bleach is used. Teamed with varnish, tea dye varnish in particular, plus a few other colouring materials outstanding effects and hues can be achieved with just a few simple techniques.
The following facts and figures will make the process more interesting, its helpful to understand products and materials. As usual, the best advice is to experiment yourself and discover new and unusual effects.
Bleach:
- Use cheap or at least plain bleach. Thin is best but thick works also.
- Use fresh bleach; after a session, pour down the sink or WC and decant fresh for the next use.
- Beware of spills on furniture, clothing and hands, keep a damp cloth and kitchen roll nearby and cover your work surface; big thick plastic mats are perfect.
- For colouring make three mixes; one plain bleach and one half/half with water and one water only with a container of water for washing brushes; wash and dry frequently.
- Change the scrap paper underneath your work frequently as bleach residue will spoil your work.
Brushes:
- Never use hair brushes, they will 'melt' in the bleach but use nylon 'Prolon' or similar.
- Very small brushes - 1 to 000 sizes - are necessary for fine work and accurate colouring, with bigger ones for backgrounds etc.
Paper and Card:
- Bleaching results depend on the dyes used and the dying process which is why darker card bleaches most dramatically. The layers of dye show depending on the strength of the bleach removing each layer plus the absorbency of the surface. Light colours can bleach to pretty pastel tones, but yellow and other primary colours often only fade when bleached.
- Not all card bleaches, black is commonly resistant to bleach, there is no way of telling except to try.
- Many recycled papers do not bleach; you just have to try them; others just fade in colour.
- Do not expect to get pure white from any card by bleaching there is usually dye left even with repeated bleaching.
- Paint/ink can be used over bleach but is usually superfluous, try for yourself.
- The best papers that I have found are pastel papers; Canson Mi-Teinte 160 grams and Fabriano Tizziano 160 grams.
- Other card often bleaches well, just try, if you find one you like make a note.The best way to test is to cut 1cm wide strips and dip in the bleach. Mark the strips to identify and staple together.
Bleaching techniques:
There are three main uses for bleach. Stamping, colouring and backgrounds.
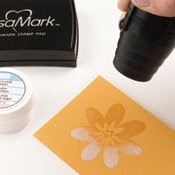
- For stamping use the bleach on a pad of paper towelling, I find that one sheet cut into four makes a good pad. Make two, one full strength and one half with water. Alternate the two to bring out different shades from the paper.
- Experiment with stamps both outline and solid for effects . Practice brings lovely results even though at first they can be disappointing.
- Uninteresting effects can be improved by sponging ink over or dabbing with cat's eye pad; no rules here, just try for yourself.
- Clean the stamp immediately with lots of water and dry well.
- For colouring stamped images stamp and emboss the image, open designs are best to start with and colour carefully to the embossed edges, bad filling-in shows more than with paint.
- Alternate strong and weak bleach mixtures according to your card and the effect you want to achieve. You might have to wait for the bleach to develop to see the finished effects.
- Sponging lightly over with Brilliance Galaxy Gold or other metallic ink can 'lift ‘ an image and make it shine.
For backgrounds and freehand effects:
- Wet the paper /card before bleaching for mottled effects applying various strengths of bleach over the card and leaving to dry.
- Over stamp, emboss or sponge on colour.
- Combine with tea dye varnish in varying strengths, paint, PearlEx, or dyes for dramatic effects.
- Add messages or words to a card using a word stamp or writing with a calligraphy pen. This is beautiful if you have a good hand. Try also using with a pen for patterns, scrolls etc. there is little to loose by trying!
Varnishing:
Acrylics are water based so easy to clean and fairly quick drying.
They come in several finishes, matt, semi gloss and gloss and as well as protecting work will add a very durable enamel like finish of choice. Available as liquid brush on or in spray cans which is quick and easy to use. Always follow instructions.
Tips:
- Mix varnishes with acrylic paint, PearlEx or dye inks for a transparent paint.
- Tea dye varnish is perfect for aging work or for decorative touches and works really well with bleaching.
- Use as paint to colour parts of an image, try mixing with PearlEx for lovely pearlescent colours.
- Sponge or stipple onto card for backgrounds and to frame bleached images.
- Use all over for an aged, antique effect; works best over autumn colours.
- Dilute and use on wet paper/card combined with bleach and PearlEx or bronzing powders for impressive background effects.
- Metallic rub-on waxes can be applied to dry varnish and glitzy bits and glitter dropped on while wet.


+with+watermark.jpg)


No comments:
Post a Comment