The final all day event for 2012

Here are the dates for 2012 Experience days that Sharon & myself have organised.

Now Booking

Saturday 1st December at Hethersett Village Hall for the last all day event of 2012 & a Christmas Card & gift event
Theme - A whole day crafting
Cost - £25

Future Dates:


Saturday 1st December ~ Christmas gift event

And don't forget for every event you attend you will receive a FREE raffle ticket which could win you a
BIG SHOT BUNDLE.

(Draw to take place during December's Event)

All DAYS HAVE VERY LIMITED PLACES SO BOOK NOW TO AVOID DISAPPOINTMENT. YOUR PLACE IS ONLY SECURED ONCE PAYMENT IS RECEIVED.


Do you fancy a catalogue party?

Did you know that you can qualify for hostess benefits without having to hold a party?

Just by showing your catalogue around to your family, friends or craft group, If you collect together orders totalling over £150 you will qualify for a free hostess benefits.

If your interested please contact me for further details.

Search This Blog

Contact me

Stampin' Up Contact details I have set these business hours to preserve my home / work life balance.

Email ~ Anytime ~ lovellsinnorfolk@hotmail.co.uk
Or call me between 9.30 Am ~ 8Pm ~ 07092984580


Saturday 2 August 2008

Bleached out images ~ Tutorial

Before I found this tutorial i have tried this technique without sucess & I melted my paintbrush!! So I think now I may have another try. Another member added a comment to this technique and said it should not be used for scrapbooking as the bleach is too harsh and she uses a cotton bud to dip into the bleach.

Bleached out Images

by Beate Johns

Use household bleach to add highlights to embossed images.
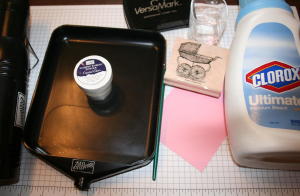
Supplies

  • Bleach

  • Plastic or glass container to hold bleach

  • Watercolor brush

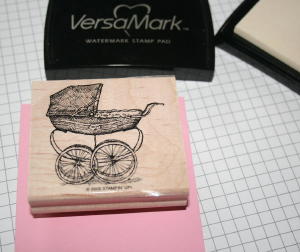
  • Detailed image stamp

  • VersaMark™ ink

  • Embossing powder

  • Embossing heat tool

  • Colored cardstock

Step-by-Step

  1. Step 1

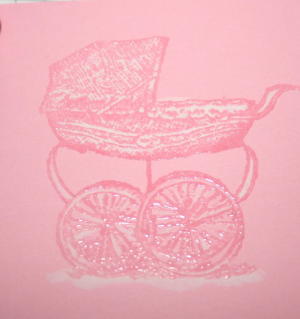
    Ink stamp with Versamark™ and stamp the image on colored cardstock.

  2. Step 2

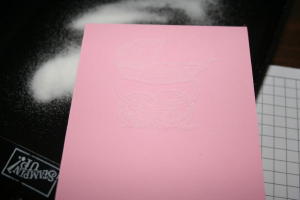
    Pour embossing powder over the image. Tap off excess. Clear embossing powder was used here to create a soft image. Any color of embossing powder would work.

  3. Step 3

    Use an embossing heat tool to heat the embossing powder until it melts.

  4. Step 4

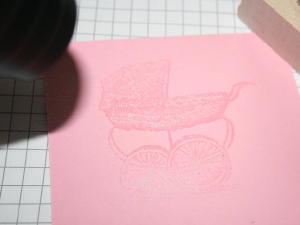
    Add bleach to a glass or plastic container and dip the watercolor brush into it. Apply bleach to image.
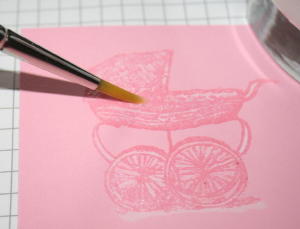
  5. Step 5

    Let dry or use the heat tool to speed up the drying process.

  6. Step 6

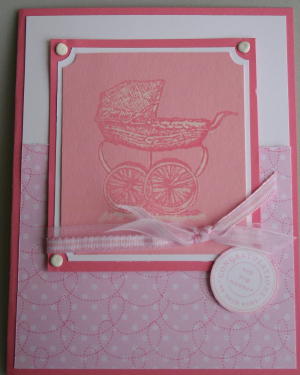
    Finish your project.

Variations

    Try Adding Color
    After bleaching out the image, let bleach dry and apply different colors to the image. Try all color mediums including colored pencils, watercolor crayons, or reinkers.


2 comments:

Lisadwb said...

Very neat!! I have not tried this technique yet, but with your tutorial I am sure I can do it now. Thank you!!
You have a very nice collection of tutorials here!!

Jo Dyer said...

An alternative to using the bleach (for archival reasons) would be to do a wash with white gouache.

Related Posts Widget for Blogs by LinkWithin

Stampin' Techniques

Stampin' Techniques
Two step Stampin

Watercolouring

Masking

Markers

Rock n roll

Stampin' Pastels

Heat embossing

Crafts are here

Crafts are here, crafts are there,

My craft supplies are everywhere.

I really should clean this mess,

but I like it I confess.

Floor is littered, chairs are piled,

Kitchen's looking pretty wild.

On the table, counter too,

Seems that any place will do.

Hall is stacked with cartons high,

filled with things folks like to buy.

Garage is full, but so far....

there's still room to park the car.

I never have an idle day,

New ideas come my way.

Don't know yet what I'll create,

but my imagination's great.

My family smiles, they don't complain,

although at times I am a pain.

but when all is said and done,

I really am a crafty one!

I"ve been visited

link to free hit counter html code
Visit the hit counters gallery.

Guest book

NeoCounter